Panorama Ambience Reverb CP-1 Digital Audio Environment Processor Owner's Manual Surround
Unpacking and Inspection After unpacking the CP-1, save all packing materials in case you ever need to ship the unit. Thoroughly inspect the CP-1 and packing materials for signs of damage. Report any shipment damage to the carrier at once; report equipment malfunction to your dealer.
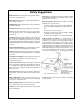
Safety Suggestions Read Instructions Read all safety and operating instructions before operating the unit. Retain Instructions Keep the safety and operating instructions for future reference. Heed Warnings Adhere to all warnings on the unit and in the operating instructions. Follow Instructions Follow operating and use instructions. Servicing Do not attempt any service beyond that described in the operating instructions. Refer all other service needs to qualified service personnel.
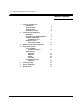
CP-1 Digital Audio Environment Processor Table of Contents 1 2 Controls and Indicators Introduction The Front Panel The Rear Panel The Remote Control Connection and Calibration 3 Installation Connections to Other Equipment Setting the Main Input and Output Levels Calibration of the Panorama Program Speaker Set-Up and Configuration 4 5 Using The Programs To Load, Modify and Store Programs The Programs: Panorama Ambience Reverb Surround To Rename and Store a Register Troubleshooting 6 7 Theory and
CP-1 Digital Audio Environment Processor All of the programs in the Lexicon CP-1 Digital Audio Environment Processor have a common goal: to draw you, the listener, more deeply into a musical performance or a film. For music the CP-1 uses unique digital processing to re-create either the original recording space or a new one of your choosing. For films it offers an extremely accurate version of Dolby Pro Logic Surround decoding and our own decoding for monaural film soundtracks.
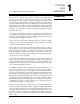
Controls and Indicators Lexicon The Front Panel exicon I DIGITAL AUDIO ENVIRONMENT PROCESSOR II SOURCE TAPE PRE CP-1 POST SYSTEM MUTE EFFECT MUTE POWER INPUT LEVEL TITLE: dlby lgo 2 CREATOR: Adobe Illustrator(TM) 1.1 SOURCE MONITOR TAPE Source The SOURCE buttons select one of two identical stereo pairs of audio inputs. Ordinarily Input I will be connected to the main outputs of your stereo preamp and the second input will be a spare.
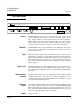
Controls and Indicators CP-1 Digital Audio Environment Processor The Rear Panel LEVEL REAR SIDE MAIN L L OUTPUTS R CENTER TAPE OUT SUB CENTER/OUT PHANTOM/IN R TAPE IN INPUTS II I L L R R SUB WOOFER Stereo outputs for rear and side power amplifiers, with level adjusting knobs. The procedure for balancing these outputs (as well as the center channel and subwoofer) with the main pair begins on page 9. Rear and Side Outputs Main outputs, with level adjustment.
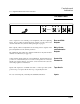
Controls and Indicators Lexicon The Remote Control PANORAMA 1 BANK 2 NORMAL WIDE 3 BINAURAL AMBIENCE 4 MEDIUM SMALL PARAM 6 5 LARGE REVERB 7 SMALL 8 MEDIUM 9 LARGE SURROUND 10 MONO 11 12 STEREO F EFFECT BALANCE B TITLE: dlby lgo 2 DOLBY SURROUND PRO - LOGIC CREATOR: Adobe Illustrator(TM) 1.
Controls and Indicators CP-1 Digital Audio Environment Processor The SURROUND programs work with film sound tracks to recreate the theater experience. MONOLOGIC (10) expands the music and effects on monaural films into the additional channels while leaving the dialog in the front center. STEREO LOGIC (11) enhances music with surround speakers and also allows the listener to adjust certain parameters for film sound that are fixed in Program 12.
Controls and Indicators Page 6 Lexicon
Connection and Calibration CP-1 Digital Audio Environment Processor 2 Installation The CP-1 may be installed on a shelf or in a standard 19" equipment rack, using the optional rack-mounting hardware (Lexicon part #021-06639). Connect the power cord to a wall outlet or to a switched outlet on the back of your preamplifier. Observe the following precautions: • Make sure the remote control receiver, located on the right side of the front panel, is unobstructed.
Connection and Calibration Lexicon TAPE OUT INTEGRATED AMP, PREAMP or RECEIVER TAPE IN MAIN CENTER AMP CENTER VCR, TV, VIDEO CONTROL CENTER I INPUTS II AUDIO OUT CP-1 TAPE OUT/IN Connecting the CP-1 in a Tape Monitor Loop Note VCR or CASSETTE DECK REAR SIDE SUB WOOFER REAR AMPS SIDE AMPS SUBWOOFER AMP If you have a receiver with no external access to the preamplifier outputs (or you wish to use the tape monitor loop on your preamp), you can use a tape output or external processor loop to th
CP-1 Digital Audio Environment Processor Connection and Calibration Push the INPUT I button on the front panel. Push the MONITOR SOURCE and TAPE PRE buttons. Turn the INPUT LEVEL knob all the way down (counterclockwise). Front Panel Adjustments The CP-1 has its own volume and balance controls, which you will be using in place of the ones on your existing preamp or receiver. Set the gains in your main stereo channels for optimum dynamic range as follows.
Connection and Calibration Lexicon Output Levels Main Output Set Main Output so system is as loud as you are ever going to need it. (Be careful that this level does not cause speaker distortion or amplifier clipping.) Balancing Additional Channels 1. Select Pro Logic 2.Push Param to CALIBRATE 3.
Connection and Calibration CP-1 Digital Audio Environment Processor PANORAMA works by canceling the sound going from each speaker to the opposite ear. The effectiveness of the program is highly dependent on the geometry of your front loudspeakers, the room and your listening position. The correct timing of the canceling signal varies with the angle between your main speakers. The SPEAKER ANGLE parameter, displayed in degrees, adjusts for wide or narrow speaker spacing.
Connection and Calibration Lexicon go on to step 6; otherwise, perform step 5. SILENCE NOISE Push PARAM UP again for RIGHT ONLY. If your left ear is in the silent band, the speaker angle is correct. Repeat for the right side. If the two silent bands are too close, raise SPEAKER ANGLE; if too far apart, lower SPEAKER ANGLE. To store, see page 29. Page 12 5. Push PARAM twice so the display reads: SPEAKER ANGLE.
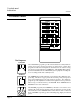
Speaker Set-Up and Configuration CP-1 Digital Audio Environment Processor 3 Configuration Choose the diagram from the Speaker Configuration Chart that corresponds to your room and note its number. Press the BANK button and hold it for a few seconds. The display will read: LCD CONTRAST ADJ with a bright bar. The CP-1 is now in Configuration mode. Within this mode, operations are carried out using only the three PARAM buttons.
Speaker Set-Up and Configuration Lexicon Notes on Amplifiers How much power do you need? That depends on a number of variables — How efficient are your speakers? How big is the room? How loud do you play the system? Generally, the demands on the side and rear channels are higher for film sound than for music. The center channel is actually the most important channel on most film soundtracks.
CP-1 Digital Audio Environment Processor Speaker Set-Up and Configuration If your center channel speaker is smaller than the left and right fronts, increasing BASS BLEND will remove low bass from the center and increase it in the left and right speakers.
Speaker Set-Up and Configuration Lexicon For Music Center Phantom Button IN Center Phantom Button IN Center Phantom Button IN 1 5 9 Good Better Best If your main interest is music, you will most likely begin with two highquality main speakers (Configuration 1). Here the Panorama program alone will add substantial enhancement in spatial impression, image size, image depth and freedom from coloration of central sources.
CP-1 Digital Audio Environment Processor The Subwoofer Output is a monaural signal created by summing the left, right and center outputs, then filtering out frequencies above 100 Hz at a rate of 12 dB per octave. Speaker Set-Up and Configuration Subwoofer Connections Connecting a subwoofer to the CP-1 rear-panel Subwoofer Output, adds bass energy without removing any from your main speakers.
Speaker Set-Up and Configuration Page 18 Lexicon
CP-1 Digital Audio Environment Processor Using the Programs 4 The CP-1 contains four basic programs: Panorama, Ambience, Reverb and Surround. Each program has three variations which occupy one row on the remote control. To Load, Modify and Store Programs Pushing one of the buttons numbered 1 through 12 during normal operation will load that program. Whenever the CP-1 is turned on, it will load the program that was running when it was turned off.
The Programs: Panorama Panorama Lexicon Panorama extracts the natural ambience from recorded music and moves it outward from the speakers, producing greater width and depth of image and a feeling of enhanced spaciousness. The program adds no additional sound but expands the existing stereo image. Panorama also works with Dolby Stereo movies, bringing the surround track outward into the room. Panorama works with just two loudspeakers.
CP-1 Digital Audio Environment Processor The Programs: Panorama EFFECT LEVEL sets the amount of crosstalk cancellation, and thus the apparent front width. It is the most important user adjustment to Panorama, and has been given its own button on the remote. When EFFECT LEVEL is all the way down, Input Balance, LF Width and the rear outputs are still active. Effect Level INPUT BALANCE compensates for the occasional source with audible channel imbalance.
The Programs: Ambience Lexicon Ambience Ambience generates the appropriate early reflections for stereo simulation of one of six different halls — one rectangular hall and one fan-shaped hall in small, medium and large sizes — and sends the reflections to the side and rear speakers. For systems with only two loudspeakers, Ambience also incorporates a version of Panorama that will spread the stereo image and add the reflections it generates to the expanded sound stage.
CP-1 Digital Audio Environment Processor The Programs: Ambience ROLLOFF mimics the absorption of the air in the hall and its initial value is therefore more pronounced (the rolloff begins at a lower frequency) the larger the space. Rolloff PANORAMA EFFECT adjusts the strength of the signal used to expand the stereo image outward from the front two speakers. It is only needed when side speakers are absent.
The Programs: Reverb Reverb Lexicon The Reverberation program differs from Ambience in that it does not simulate the early reflections of specific halls, but emphasizes rich, smooth reverberant decay in small, medium or large spaces. It works well for simulating a space with a long reverberation times relative to its size, such as a reverberant chamber, church or the like.
CP-1 Digital Audio Environment Processor The Programs: Reverb MID RT (Midrange Reverberation Time) is the time required for midrange sounds to decay 60 dB in level. Your choice of small, medium or large synthesized space determines both the initial value and the available range of MID RT. Mid RT BASS RT, the low-frequency reverb time, depends on the MID RT and is expressed as a multiplier.
The Programs: Surround Lexicon Surround The SURROUND programs are designed for film sound tracks and they make full use of additional loudspeakers at the center, sides and rear of the room. MONO LOGIC takes a monaural soundtrack and sends music and sound effects to the sides and rear through a room simulator program, while keeping dialog in the center. STEREO LOGIC is meant for playing music through a system whose speakers are laid out primarily for films.
The Programs: Surround CP-1 Digital Audio Environment Processor Stereo Logic Parameter FRONT EFFECT REAR EFFECT REAR ROLLOFF BASS BLEND AUTO AZIMUTH/BAL REAR DELAY REAR NOISE CHIP CALIBRATE SET PROGRAM NAME MEMORIZE PROGRAM Initial Value Range 8 8* 14.1 kHz 0-16 0-16 329 Hz-14.
The Programs: Surround Lexicon Program Parameters cont'd Page 28 Auto Azimuth/ Balance The AUTO AZIMUTH/BAL parameter should be set to ON for films, OFF for music. When it is on, special digital circuits continually monitor the dialog and adjust both the relative level and time offset of the two channels to keep the dialog properly centered. This automatic feature is why the CP1 does not have or need a front-panel input balance control for Dolby Surround decoding.
Using the Programs CP-1 Digital Audio Environment Processor To Rename and Store a Register The previous sections describe the CP-1’s four basic programs and all of their variable parameters. Any changes in the parameters of a program in the USER bank will be automatically recorded and stored for future use. The CP-1 also allows you to store a new version of any PRESET or USER program in any USER register.
Using the Programs Lexicon Page 30
CP-1 Digital Audio Environment Processor Troubleshooting 5 Troubleshooting If you encounter a problem, please review the items in the following checklist. Also be sure to thoroughly check all other connected components such as speakers, receiver/amplifier/preamp, VCR, TV, CD player, etc. Problem Possible Cause and Solution Input level meters not functioning Make sure INPUT LEVEL on the CP-1 front panel is turned up. Check the connections on the rear and make sure signal is going into the CP-1.
Troubleshooting Problem Lexicon Possible Cause and Solution Muffled sound in L&R channels When no center channel is used, the rear-panel phantom button must be pushed IN. Center channel sound muffled The center channel amp may be connected to the subwoofer jack on the CP-1 rear panel. Reconnect to Center Output jack. Hum Finding and eliminating audio hum in a complex installation can be a very frustrating task.
CP-1 Digital Audio Environment Processor Problem Restoring defaults Troubleshooting Possible Cause and Solution If severe power surges or sags cause problems with CP-1 memory storage, or you simply want to start with a clean slate in the User registers, you can restore factory presets into the User registers with the following procedure. This will erase any programs you have stored in the User register, so you may want to note any settings you wish to re-use before proceeding. Turn CP-1 power OFF.
Troubleshooting Page 34 Lexicon
CP-1 Digital Audio Environment Processor Theory and Design 6 Lateral Sound Concert Hall Acoustics For decades the study of concert-hall acoustics relied on certain basic measurements to characterize halls, the main one being the time it takes a sound to drop in level (decay) by 60 decibels. This is called the reverberation time or RT60 and is approximately the same as the time it takes a hand clap to subside to inaudibility.
Theory and Design Lexicon } Side sound must be within this angle. Sound from the side is vital to listener comfort and involvement....It must really be from the side! Understanding the importance of lateral reflections enabled more accurate evaluation of architectural acoustics. The best halls were usually found to have high lateral energy for obvious architectural reasons, such as a long narrow shape with high ceilings.
CP-1 Digital Audio Environment Processor Theory and Design sides. Both methods depend on having the added sound come from a different direction than the original music, and each method has some advantages. With either method of generating SI there is an additional choice the CP-1 allows the user to make: the sideways energy cues of the original recording can be extracted by the CP-1, or a different hall sound can be generated and supplied from the correct directions.
Theory and Design Lexicon The Panorama Program Loudspeakers placed on either side of the listening position are the most effective and foolproof way to produce added Spatial Impression. Since it is not always possible to have side loudspeakers, the CP-1 uses crosstalk elimination to simulate them when they can’t physically be there. In Panorama the front speakers are driven entirely by the front digital outputs of the CP-1. (Panorama disables any side speakers present, and simulates them electronically.
Theory and Design CP-1 Digital Audio Environment Processor quency. Lexicon’s implementation, called the Panorama program, was designed using measured data on sound diffraction around the head to shape the frequency spectrum of the canceling signal.
Theory and Design Lexicon In a well-damped room with loudspeakers mounted on stands away from the walls, the Panorama effect can be very exciting, giving the closest possible approximation to the actual hall used for the recording. With true binaural recordings (made with a modern dummy head with accurate external ears and proper equalization) the playback can be uncannily realistic. And, unlike previous versions of this technique, the Panorama program adds virtually no coloration to the original signal.
Theory and Design CP-1 Digital Audio Environment Processor Panorama greatly increases low frequency width and should only be used with true binaural recordings, which have very little out-of-phase low frequency energy. A few compatible binaural recordings are becoming available, in which the low frequency width has been increased to match the requirements of loudspeaker playback. These recordings may sound best when played with the Normal setting.
Theory and Design Lexicon be the sound that comes from the sides. Early research with quadraphonics involved extensive experimentation with speaker placement, and confirmed that additional speakers beside the listener sounded better than the conventional approach of putting pairs of speakers in front and behind.
Theory and Design CP-1 Digital Audio Environment Processor music. If you have no side loudspeakers, both Ambience and Reverb contain versions of the Panorama program that will simulate them within a narrow area between the speakers. Choosing one of the speaker configurations with no side speakers (see page 13) will automatically turn the Panorama Effect on and mix the side outputs into the main outputs.
Theory and Design Lexicon The Surround Programs sides to the front, while leaving the side outputs on.) The Surround programs: Mono Logic, Stereo Logic and Pro Logic, are specifically designed for film sound or for systems set up primarily for Mono Logic enhanced film viewing. Mono Logic is a stereo conversion program for monaural film sound tracks. A quick look through any video rental selection will prove the usefulness of such a program; the vast majority of titles are mono.
CP-1 Digital Audio Environment Processor Theory and Design room simulator has outputs for left, right, side and rear surround speakers. The monaural input sound from the film is unchanged in the center speaker, so that all the dialog and music that the director expected to come from the screen still does, with no modification or reverb.
Theory and Design Lexicon placements. Dolby Surround Decoding When the movie is shown the two Dolby Stereo tracks must be decoded and separated into the original four. The Dolby Surround decoder does this in a rather rudimentary way: it supplies a signal to the center channel which is just the sum of the two input channels. This signal contains the dialog. However, the left and right signals still contain dialog too, so the dialog is spread out among the three front speakers.
CP-1 Digital Audio Environment Processor Theory and Design is even more important in a home decoder than in a professional model, because the small size of the playback room makes decoding errors more audible than they are in a theater. The level detection must be very fast, and the matrix must adapt very quickly or there will be a time lag between the audibility of a sound and its correct steering.
Theory and Design Lexicon result is superior steering. An added benefit is that the CP-1 is the only Pro Logic decoder which needs no front panel input balance control; the user need not bother with this adjustment. You can check the quality of the balance and azimuth in a tape or disc if you wish by turning the Auto Azimuth/Balance parameter off and observing any changes in the location of dialog and effects.
CP-1 Digital Audio Environment Processor Theory and Design sounds appear in the front left and right speakers (and the side left and right speakers, if present). The Rear Noise Chip parameter is preset to OFF, meaning that the highfrequency sound in the rear channels is set solely by the Rear Rolloff parameter. (The Rear Noise Chip should be ON for Dolby Surround programs.) Rear Rolloff is preset to 14.1 kHz, its highest constant value.
Theory and Design Lexicon sound does not. Occasional extra wide sound effects can seem peculiar at first for being so much wider than the screen but when the mix is good the emotional impact of the wide sound can be very great. The disparity between the size of the video screen and the size of the sound is usually easy to accept, and the added impact is hard to give up once you have heard it. A few theaters are beginning to wake up to the power of this effect.
Theory and Design CP-1 Digital Audio Environment Processor References 1. Schroeder, M.R., Gottlob, D. and Siebrasse, K.F.,"Comparative Study of European Concert Halls: Correlation of Subjective Preference with Geometric and Acoustic Parameters", J. Acoust. Soc. Am., vol. 56, pp. 1195-1204 (1974). 2. Barron, M., and A.H. Marshall, "Spatial Impression Due to Early Lateral Reflections in Concert Halls: The Derivation of a Physical Measure", J. Sound Vibration, vol. 77, pp. 211, 232 (1981). 3. Griesinger, D.
Theory and Design Page 52 Lexicon
Specifications CP-1 Digital Audio Environment Processor Frequency Response: Unprocessed channels: Processed channels: 7 10 Hz - 100 kHz, +1, -3dB* 10 Hz - 16 kHz, +1, -3dB* *Ref. 1 kHz THD: Front: Sides: Center: Rears: Subwoofer: Minimum Input Level: 300 mVRMS Maximum Output Level: 3.5 VRMS Input Impedance: 50 k ohms Output Impedance: 500 ohms Signal to Noise Ratio: Voltage: Dimensions: Weight: Optional Equipment: Less than .05%, 1 kHz, max level Less than .
3 Oak Park Bedford, MA 01730 USA Telephone 781-280-0300 FAX 781-280-0490 www.lexicon.com 06/00 | Lexicon Part #070-06619 | Rev 3.