NSR-ORA V3.
Copyright and Trademarks Copyright © Fujitsu Siemens Computers GmbH 2001. All rights reserved. Delivery subject to availability; right of technical modifications reserved. All hardware and software names used are trademarks of their respective manufacturers. This manual was produced by cognitas. Gesellschaft für Technik-Dokumentation mbH www.cognitas.
1 Preface This guide provides information about how to install, configure and operate the “NetWorker Save and Restore for ORAcle (NSR-ORA)” V3.2 NetWorker component. 1.1 Audience The information in this guide is intended for system and database administrators. 1.2 Conventions This manual uses the following typographical conventions and symbols to make information easier to access and understand. boldface Indicates emphasized words, e.g.
Preface 1.3 What is New in Release 3.2 What is New in Release 3.2 With release V3.2 a number of changes have been made to NSR-ORA, influencing this guide: ● NSR-ORA V3.2 does now support Oracle 8.x or 9i ● Version 9 of the Oracle database does not include the SVRMGRL command any more. So NSR-ORA now uses the command stored in the SQLDBA variable to communicate with the database. However, functionality of NSR-ORA has not been changed. ● NSR-ORA V3.
2 Introduction This guide to Backing up and Restoring a Database describes the functionality, installation, configuration and adminstration of the NetWorker component “NetWorker Save and Restore for ORAcle (NSR-ORA)” V3.2. This software component allows to integrate ORACLE databases into the Networker data backup concept. NetWorker is intended for automatic data backup in heterogeneous networks.
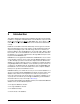
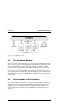
Introduction 2.1 The Physical Database Structure The Physical Database Structure The physical database (see figure 1) consists of at least one control file, one parameter file, at least two redolog files and at least one database file. control file redolog files configuration file database file Figure 1: The physical database structure ● The database file(s) contain the data dictionary as well as the actual user data (tables, indices, views etc.).
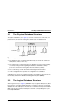
Introduction The Database Backup database files control file redolog files USER SYSTEM TEMP Tablespaces Figure 2: Logical database structure 2.3 The Database Backup Every recovery procedure depends on a correctly performed database backup, which consists of copies of the database files being made at operating system level and transferred to an external storage medium or created as a NAS snapshot. These copies depict a state that is not identical to the current one.
Introduction Archive Mode of the Database NSR-ORA checks that the database is in ARCHIVELOG mode, and will abort the backup of the database if this is not the case if an online backup is to be carried out. An offline backup can be performed even if the database is not in ARCHIVELOG mode.
Introduction Function Scope these redolog files had already been saved on the backup medium by the archiving monitor and then automatically deleted, they will be read in again and reapplied until the database is up to date. The database is then opened and is again ready for normal operation. The recovery is triggered by the ora_recut and nsrora_rec commands and proceeds automatically; a knowledge of ORACLE is not necessarily required for this (see also chapter “Recovery”). 2.
3 The individual Components The individual components for backing up and recovering an ORACLE database in a NetWorker environment are described in the following section. Four different areas are dealt with: ● The archiving monitor ● The backup component ● The recovery component ● The overall configuration Each section starts with a functional description.
The individual Components The Archiving Monitor DBMS database files Oracle’s archiving process control file SYSTEM USER TEMP redolog files Treshold value Tablespaces archive directory Database interface NSR-ORA Archiving monitor Volume management Volume pool management Multiplexing Jukebox support Tape library Figure 4: The archiving monitor The archiving monitor amon has the task of permanently and regularly monitoring and backing up the offline redolog files, which accrue in the archive direct
The individual Components 3.1.1 The Archiving Monitor Starting and Ending the Archiving Monitor A control program start_amon.sh is provided in the directory ${NSR_INST}/oracle/bin for coordinating the activities of the archiving monitor. This program can be invoked at operating system level with the relevant parameters (start, status, stop). start_amon.sh [-t {nsr|emc}] [ ...
The individual Components The Archiving Monitor AMON_GROUP=amon_ora_psi AMON_MAX_LOGS=4 AMON_INTERVALL=1800 AMON_MIRROR_GROUP=amon2_ora_psi AMON_MIRROR_SERVER=psi With these prerequisites fulfilled, the user can start the archiving monitor: sh> start_amon.sh start ora ORACLE_SIDs : ora start amon for oracle instance ora ... A subsequent status enquiry generates the following output: # start_amon.sh status ora ORACLE_SIDs : ora Configuration and Status summary of amon at 15.09.
The individual Components 3.1.2 The Archiving Monitor Logging While the archiving monitor is active, the occupancy level of the archive directory and other important events are logged at regular intervals (AMON_INTERVALL) in the protocol file ${DBO_CONFIG_DIRECTORY}/prot/redologs/amon.prot. Protocol file There are four generations of the protocol file. The current protocol file is appended to the file amon.old with each restart. If this file exceeds a size of 5 Mbytes, it is renamed from amon.
The individual Components The Backup Component ...... 00-05-08:16:52:01: DEBUG:oraarch1_54.dbf 01/21/00 13:13:15 s: 0 m: 0 00-05-08:16:52:01: DEBUG: Print of a save_cmd: /opt/networker/bin/save -i -l full -g amonorapsi -s psi 00-05-08:16:52:01: oraarch1_42.dbf oraarch1_43.dbf oraarch1_45.dbf oraarch1_44.dbf oraarch1_46.dbf oraarch1_47.dbf oraarch1_48.dbf oraarch1_49.dbf oraarch1_50.dbf oraarch1_51.dbf oraarch1_52.dbf oraarch1_53.dbf oraarch1_54.dbf. 3.
The individual Components The Backup Component DBMS database files Oracle’s archiving process control file SYSTEM USER TEMP redolog files Treshold value Tablespaces archive directory Database interface NSR-ORA Backup Archiving component monitor NetWorker user interface Volume management Volume pool management Multiplexing Jukebox support Tape library Figure 5: The backup component 3.2.
The individual Components The Backup Component 1. The database is started up briefly to determine the database files allocated to a tablespace. Normally, several tablespaces are backed up during an archiving process. 2. The database is closed. 3. All the database files of a tablespace are backed up, irrespective of whether system files or raw devices are involved.
The individual Components 3.2.2 The Backup Component Online Backup of the Database An online backup of the database is performed whenever the database is open at the time of the backup. In contrast to offline backups, the following phases are carried out: 1. All database files allocated to a tablespace are determined. 2. Backup is commenced with the ORACLE-specific command alter tablespace begin backup. 3.
The individual Components 3.2.4 The Backup Component Checking backups (troubleshooting) If an error occurs when backing up the database or if one of the backup processes does not end cleanly, the entire database backup is aborted and all tablespaces are reset to the status NoSave. You can check whether a backup has been completed successfully by examining the protocol files (*.prot) which are located in the directory /nrs/oracle/${ORACLE_SID}/prot and its subdirectories.
The individual Components The Backup Component The shell script saveinfo.sh in the directory $NSR_INST/oracle/bin evaluates the protocol files save*.prot in the subdirectory tablespaces and tells you the status, the start and end of a backup, the type of backup (online|offline) and the names and sizes of the backed up tablespaces. You can call saveinfo.sh at any time, even while there is a backup in progress.
The individual Components The Backup Component concurrency used by NSR-ORA when backing up tablespaces is one less than the concurrency of NetWorker when nsrora_save_cmd is not used, because NSR-ORA always uses one backup for internal purposes. ! The database must not be started up while an offline backup is in progress.
4 Installation and Configuration The following chapter describes the installation and configuration of NSR-ORA. 4.1 Quick Start This section gives experienced users an short overview of all steps required to install and configure NSR-ORA. It is a synopsis of the information presented in this chapter and the rest of the manual and is intended to help you to get NSRORA “up and running” quickly and easily. In order to install NSR-ORA and prepare it for use you need to carry out the following steps: 1.
Installation and Configuration Installation 9. Start the archiving monitor amon using the following command: start_amon.sh start $ORACLE_SID (refer also to section “Starting and Ending the Archiving Monitor“) 10. Check the results of your first backup (see “Checking backups (troubleshooting)” for this). 4.2 Installation NSR-ORA is supplied together with NetWorker on CD-ROM.
Installation and Configuration Installation # /opt/nsr/keylic -s is the name of the NetWorker server. ● For NetWorker servers from Fujitsu Siemens Computers prior to NetWorker Version V5.5A21 and Reliant UNIX clients or third-party clients for Solaris: # /opt/nsr/oracle/bin/keylic -s is the name of the NetWorker server.
Installation and Configuration Installation Proceed as follows for installations under Solaris: Ê If you are performing the NetWorker installation on the console, the installation program opens automatically when you insert the CD. If you are not working on the console, work through the following steps to start the installation: Ê Insert the NetWorker CD into the CD-ROM drive. Solaris then automatically executes the mount operation. Ê Log in as root.
Installation and Configuration Installation Ê Set the DISPLAY variable: # DISPLAY=:0 Ê Enter the following command to change to the product directory on the CD: # cd /mnt/cdrom Ê Invoke the following command: # ./autorun Ê Choose the nsrora package. The installation is performed with rpm (see rpm(8)). The software to be installed is packaged in RPMs. These are installed automatically with the following command: # rpm -i nsrora The installation directory cannot be selected.
Installation and Configuration Configuration # cd /tmp/nsr-ora Ê Unpack the NSR-ORA.tar file from the CD: # tar xvf /cdrom/NSR-ORA.tar Ê The installation is then continued with the command: # swinstall -s /tmp/NSRORA_HP_PKG \NSR-ORA 4.3 Configuration 4.3.1 How to Proceed for an Update from an Earlier Version If you had already installed Version 2.0 or higher of NSR-ORA before you install V3.2, then the following sections on the configuration do not necessarily apply in your case.
Installation and Configuration 4.3.2 Configuration Preparations First make sure of the following: If you have several database instances on one computer, the redolog files of the various instances must have been created each in their own separate directory. ! As the next step you should draw up a backup schedule for your database. This is a task for the database administrator.
Installation and Configuration Tablespace ---------SYSTEM File -------------------------/oracle/7_0_16/dbs/system1.dbf /oracle/7_0_16/dbs/system2.dbf ********** sum Configuration Size in [K] in [M] 8,192 2,048 ------10,240 8 2 ----10 TEMP_TS ********** sum /oracle/7_0_16/dbs/temp1.dbf 4,096 ------4.096 4 ----4 ROLLBACK_TS ********** sum /oracle/7_0_16/dbs/rb1.dbf 8,192 ------8,192 8 ----8 USER1_TS /oracle/7_0_16/dbs/system11.dbf /oracle/7_0_16/dbs/system12.dbf 4,096 4.
Installation and Configuration Configuration lation directory). This file contains SQL commands, which are executed each time sqldba or svrmgrl is called. There should be no SQL commands here which could lead to error messages of the form (ORA-xxxx) when sqldba or svrmgrl is called: NSR-ORA would notice these error messages when sqldba or svrmgrl is called and might draw false conclusions from them about the state of the database. Please note that with ORACLE Version 9.
Installation and Configuration Configuration In the configuration directory /nsr/oracle/${ORACLE_SID} on request a directory is created for each weekday (monday, tuesday,...), and the directory ${ORACLE_SID}_full_save is created for full backups. If the database is running, all tablespaces that are currently active are entered in the ${ORACLE_SID}_full_save file. In addition, directories are created for temporary files (./tmp), protocol files (./prot) and for the NSR-ORA configuration file (./config).
Installation and Configuration Configuration ORACLE_SID Name of the ORACLE entity. If several ORACLE databases are installed on the same computer, NSR-ORA can distinguish them clearly by means of the ORACLE_SID. ORACLE_OWNER ORACLE owner. ORACLE_GROUP ORACLE owner group. ORACLE_HOME Directory where ORACLE is installed in. NetWorker Parameters NSR_INST=/opt/nsr NetWorker installation directory.
Installation and Configuration Configuration The next query depends on the usage of an NAS filer. When you are using such an NAS filer and so answer y to this question you have to input the information described in section “Configuring NSR-ORA”. BACKUP_COMPRESS=true | false | gzip | bzip2 Compression of the database files is controlled via the BACKUP_COMPRESS parameter. It may take the following values: true Selecting true for BACKUP_COMPRESS causes the default compression mode (Lempel-Ziv) to be used.
Installation and Configuration Configuration This makes it possible to carry out a recovery more rapidly, or to carry out a point-in-time recovery without having to read in the redolog files, since the existing redolog files can be used. AMON_INTERVALL The parameter AMON_INTERVALL determines the time interval (in seconds) at which the archiving monitor is induced to compare the current number of accrued offline redolog files with the value of AMON_MAX_LOGS.
Installation and Configuration Configuration OPS Parameters OPS=yes|no You use this parameter to specify whether or not NSR-ORA will be used under Oracle Parallel Server (OPS). OPS_INSTANCES If you are using NSR-ORA under OPS, this parameter contains a list of the names of all computers on which an OPS instance is running (e.g.: psi_1,psi_2).
Installation and Configuration Configuration AMON_MIRROR_GROUP Name of an optional second NetWorker backup group for the archiving monitor. If this mirror backup is to take place on a different NetWorker server, the name of that server must also be specified under AMON_MIRROR_SERVER. This database server must also be known to the NetWorker server as a client. If no entry is made for AMON_MIRROR_GROUP and AMON_MIRROR_SERVER in the configuration file dbo${ORACLE_SID}.init, no mirror backup is performed.
Installation and Configuration Configuration ● GZIP is used with the default value 1. ● BZIP2 no level is given to, so the default value of the algorithm will be used (see the uasm(1) manpage for further information). 4.3.5 Defining backup sets (save sets) The NSR-ORA administrator is able to specify save sets (offline backups, full backups, partial backups) by defining corresponding sub-directories in the directory $DBO_CONFIG_DIRECTORY.
Installation and Configuration Configuration /nsr/oracle/ora/wednesday: USER1_TS USER2_TS /nsr/oracle/ora/thursday: ROLLBACK_TS USER1_TS /nsr/oracle/ora/friday: USER1_TS /nsr/oracle/ora/${ORACLE_SID}_full_save: SYSTEM /nsr/oracle/ora/${ORACLE_SID}_offline: SYSTEM i Note that only one file (in our example: SYSTEM) is needed in the directories ${ORACLE_SID}_full_save and ${ORACLE_SID}_offline for a tablespace that is to be backed up.
Installation and Configuration Configuration This configuration helps fulfill the requirements for the NSR-ORA administrator to define a backup schedule within NetWorker. The steps necessary for this are explained in the following section. 4.3.6 Configuring NetWorker To simplify the NetWorker configuration process, the tool configure_networker is provided for the first-time configuration. It is located in the directory $NSR_INST/oracle/config. Note that this tool requires the file dbo${ORACLE_SID}.
Installation and Configuration Configuration You will find an example of the progress of configure_networker below: root 68 # configure_networker create ORA2 *-----------------------------------------------------------------------------* | | | This script helps you to configure your Networker server(s) so you are | | able | | - to save and restore your database and to run the archive monitor, | | - to run a mirror archive monitor on another Networker server.
Installation and Configuration NSR-ORA in OPS clusters They will be used to configure your NetWorker Server. Please press ENTER to continue created created created created created created created created created resource resource resource resource resource resource resource resource resource id id id id id id id id id 0.20.3.237.51.225.160.62.77.0.0.4(1) 0.21.3.237.51.225.160.62.77.0.0.4(1) 0.22.3.237.51.225.160.62.77.0.0.4(1) 0.23.3.237.51.225.160.62.77.0.0.4(1) 0.24.3.237.51.225.160.62.77.0.0.4(1) 0.
Installation and Configuration NSR-ORA in OPS clusters ... Please also refer to the descriptions in the sections “Configuring NSR-ORA” und “Configuring NetWorker”. ● All OPS nodes have to be entered as clients on the OPS node on which NSR-ORA is being configured. The clients do not have to belong to any group, they just need to have been configured. ● The archiving monitor (amon) has to be present on each OPS node.
Installation and Configuration 4.5 Troubleshooting Troubleshooting Backing Up an Oracle Database Version 8.0 or higher There is an Oracle Error in Oracle 8.0 to 8.0.5 (Generic BUGID 673508 and 677804) which may lead to an inconsistent backup when performing an online backup (the redolog files are corrupted). NSR-ORA on LINUX You need ksh to use NSR-ORA. This means that the pdksh package must be installed on the LINUX computer.
5 Recovery This chapter describes the various ways in which you can carry out a recovery for an ORACLE database. We recommend you try out a recovery of your database on a test system. This will enable you to become familiar with the possible procedures, so that in a genuine emergency you will be in a position to decide which type of recovery is appropriate.
Recovery Selecting the Type of Recovery Naturally, you can also restore the database “manually”, i.e. without using the automatic facilities of NSR-ORA. DBMS Oracle’s archiving process Database files Control file SYST. USER TEMP Tablespaces Threshold value Redolog files Archive directory Database interface NSR-ORA Recovery component Archiving monitor NetWorker user interface Volume management Volume pool management Multiplexing Jukebox support Tape library Figure 6: The recovery component 5.1.
Recovery 5.1.3 Selecting the Type of Recovery Automatic Recovery (Crash Recovery) In the case of a fully-automatic recovery, NSR-ORA deals with the entire task of restoring the damaged tablespaces and redolog files without any further operator intervention. It communicates with ORACLE, enquires which tablespaces are damaged and recreates them. Then it asks for the necessary redolog files and recreates these, if they have already been backed up.
Recovery ! Performing a recovery An automatic recovery is quite unsuitable if the fault in the database files is not a physical media failure but a logical error in the data of the database. The automatic recovery procedure has no way of detecting logical errors. An automatic recovery always reproduces the last backed up state prior to a physical fault. In order to reproduce an earlier condition, e.g. before the occurrence of a logical error, you can use the command ora_recut (recovery until time).
Recovery 5.2.1 Performing a recovery Automatic Recovery for an Optional Point in Time This section documents the use of the ora_recut command with the aid of which you can automatically recover a specific database level (recovery until time). In order to recover a specific database level you can use the following command: ora_recut [] [-t
Recovery Performing a recovery Please look for a solution or give up!! Sqldba> or ERROR: couldn’t get log_file <....dbf> Please try to find it yourself $ You can enter optional commands after the prompts Sqldba> and $ in order to recover errors (e.g. to stop a database, rename a file, etc.). When you have finished, just enter %? to return to ora_recut. You can then decide whether you want to continue the recovery using ora_recut or whether you want to abort it.
Recovery Performing a recovery INFO: Following database files are required to perform a recovery: /oracle/7_0_16/dbs/benutzer1NSR.dbf INFO: *** Crash Analyzer finished *** INFO: *** Invoking Database Restauration *** INFO: Trying to restore /oracle/7_0_16/dbs/benutzer1NSR.dbf recover: Using ufo as server for ufo Recovering 1 file into its original location Total estimated disk space needed for recovery is 4.1 MB Requesting 1 file, this may take a while ... ./benutzer1NSR.
Recovery 5.2.3 Performing a recovery Manual Recovery This section describes how to completely restore a database (that is, to restore all the tablespaces) manually (i.e. without using NSR-ORA’s automatic facilities) and - if necessary - to a state which it had at some earlier time. We shall assume that you are familiar with both NetWorker and ORACLE. ORACLE gives you the option of carrying out a recovery either offline or online.
Recovery Performing a recovery This command gives you the names and the save set IDs of all the files saved in in the period specified. 5. Remove the save set IDs of the following files from this output: – recover_info_last – bootstrap – .../nsr/index//db 6. Recover the remaining save sets again: # recover -a -f -S -S ... 7. For the recovery of an online backup only: In an online backup the control file is not saved with its correct pathname.
Recovery 5.2.4 Performing a recovery Recovery with ORACLE Parallel Server (OPS) If OPS is being used, you must pay attention to some further prerequisites: ● All OPS instances have to have been specified in the configuration of NSRORA. Instances that were added at a later date have to be contained in the file /nsr/oracle/${ORACLE_SID}/config/dbo${ORACLE_SID}.init and also have to have been added to the variable OPS_INSTANCES. ● On all OPS instances, the .
Recovery Troubleshooting started. You are recommended to use the archive directory of the ”recovery instance“ for this purpose. You can determine which directory this is by issuing the following command: show parameter log_archive_dest In this case you can use the autorecovery option; after you call recover database ... ORACLE will then automatically process the redolog files. If you use one or more other directories you will have to specify the pathname for each redolog file interactively with ORACLE.
Recovery Troubleshooting log belongs to wrong database archived log ends at change nnnnn, need later change mmmmm If you get this or a similar error message, then the reason is generally that you executed an open database resetlogs command after a recovery until time and then copied in another database level again. This means that the online redolog files are no longer numbered consistently. Only a manual recovery can correct this error.
6 Using NSR-ORA with NetApp Filers This chapter describes how to configure and use NSR-ORA with NetApp Filers 6.1 Running NSR-ORA with NAS devices NSR-ORA allows database files stored on a Network Attached Storage (NAS) you to be backed up or recover or recovered using NDMP (Network Data Management Protocol). The data is written and read directly from the NAS device to the backup media, so the performance of the database computer is not degraded during the backup process.
NSR-ORA and NetApp Prerequisites ● The administrator may perform an offline backup within a few minutes. This is done by making NSR-ORA shut down the database automatically and restarting it after the backup process is completed (i. e. after the snapshot is created). ● Depending on the backup cycle you may reduce the number of tape media units required may be reduced (having additional snapshot backups means that less backups on tape media are required). 6.
NSR-ORA and NetApp 6.3 Recommendations Recommendations This section provides recommendations for using NSR-ORA to backup data on high performance NAS devices. 1. For the Archivelog files backup (Amon backups) and to save the backup information a second, non-NDMP device is required. This device should be connected to the database server. However it is also possible to use another remote volume, that does not work with the NDMP protocol and in this case the data is backed up over the network. 2.
NSR-ORA and NetApp Configuring NSR-ORA NETAPP_SNAP_NR=[0-30]:[0-30]:[0-30] This parameter defines the type of and number of snapshot backups to be kept for a restore process. NetWorker uses three types of snapshots: snapshot-by-week (first value), snapshots-by-day (second value) and snapshot-by-hour (third value). The sum of all three values must not exceed the value 30. NetWorker names the snapshot files automatically using the following scheme: nsrora__.
NSR-ORA and NetApp i Configuring NSR-ORA Using the snap list command the administrator can obtain information about the number and the dates of creation of the existing snapshots. Example: NETAPP_SNAP_NR=2:5:5 With this command, NetWorker will perform a level-1-backup every four hours and will additionally run a backup with the level full at 23.00 h every day. If the parameter NETAPP_SNAP_NR is set as above NetWorker will keep two snapshots-by-week, five snapshots-by-day and also five snapshots-byhour.
NSR-ORA and NetApp Configuring NSR-ORA database rarely change, it may be usefull to keep the snapshots for a few weeks. If the rate of change is high it may be suffient to keep only a few snapshots-by-hour. For a moderate rate of changes it may be useful to keep a number of snapshots-by-hour and, additionally, some snapshots-by-day. The NetWorker adminstrator and database(s) administrator need to work together to tune the parame-ters for a particular database.
NSR-ORA and NetApp Configuring NSR-ORA The configure_nsrora script does not ask you to set up this parameter, so you may have to set it up manually by changing the dbo${ORACLE_SID}.init configuration file. With this parameter you choose the protocol NSR-ORA uses to communicate with the database. Currently NetWorker supports the two following protocols: RSH The RSH communication protocol is highly recommended.
NSR-ORA and NetApp Configuring NSR-ORA The configure_networker script provides the choice between the following three scenarios for the backup of NetApp filers: Scenario 1: Three Backups per Day In this scenario NetWorker performs three backups per day: At 12:00 h and 16:00 h a snapshot backup is performed. At 23:50 h another snapshot with an additional tape backup is started.
NSR-ORA and NetApp Configuring NSR-ORA Scenario 3: Seven Backups per Day In this scenario NetWorker performs seven backups per day: Every four hours a snapshot backup is performed. Additionally another snapshot with an additional tape backup is started at 23:50 h. Two NetWorker groups are generated automatically: ● one group for tape backups: – – – – ● Interval: 24 h Level: full Start: 23:50 Name: _NDMP one group for pure snapshot backups: – – – – 6.4.
NSR-ORA and NetApp Configuring NSR-ORA Password attribute ● For an NDMP backup the NDMP client needs the password of the NDMP user for the NetApp Filer. This password must be entered into the attribute Password. Backup command attribute ● Here the administrator should enter the following command: nsrndmp_save -T dump Application information attribute ● Here enter the following information: HIST=y UPDATE=y REMOTE=y NDMP attribute ● For the NDMP client this attribute must be set to “Yes”. 6.4.
NSR-ORA and NetApp Configuring NSR-ORA However if you require irregular snapshot backups (e.g. only during the working hours) then you must create different groups depending the different snapshot backups. One group for the tape backup (daily of every n days). ● There are some basic rules to follow for the groups controlling the backup cycle: Be careful to provide a sufficient delay between the tape backup and the next pure snapshot backup.
NSR-ORA and NetApp Configuring NSR-ORA This parameter overwrites the backup level of the respective NetWorker client which is preset in the clients schedule. Thus you can reduce the configuration to the definition of a client. “Pure snapshot backups” always use level “1” in this attribute. ! ● If the groups Interval value is set to less than 24 hours, NetWorker will overwrite the Level setting with “incr”, as long as the Force incremental attribute is not set to “No”.
NSR-ORA and NetApp Configuring NSR-ORA If the save set NDMP is backed up, NSR-ORA saves the database in the current state (online or offline). This corresponds to save set ${ORACLE_SID}_full_save). Save set NDMP_OFFLINE causes NSR-ORA always to switch the database offline, before it is saved. After the backup NSR-ORA restarts the database, if it has been online during the start of the backup. Otherwise the database stays offline.
NSR-ORA and NetApp Backup Pools NSR-ORA needs two or three NetWorker pools for NDMP backups: ● One pool is required for the backup of database tablespace files. This pool must be usable on the NDMP drive. These pools must also be available for normal (non-NDMP) drives. When starting a database backup and during the backup of log- and Oracle files the relevant pool is also required by the NetWorker server or storage node.
NSR-ORA and NetApp Backup If the level is set to a value between 1 and 9 then NSR-ORA simply creates a snapshot. Save Set: When the save set NDMP is used the current state of the database will be backed up. ● With the save set specified NSR-ORA performs an offline backup of the database. Normally, this means that NSR-ORA shuts down the database before starting a backup and starts it again when the backup process has completed.
NSR-ORA and NetApp i Recovery The saveinfo.sh command is not relevant to the NDMP backup method, and it will not be started after the backup has completed. If the backup process has been performed successfully you will be informed by the savegrp completion notification. 6.5.3 Debugging To enable debugging functions NSR-ORA creates a number of files within the /nsr/oracle/{ORACLE_SID}/prot/dbg directory for every backup performed.
NSR-ORA and NetApp Recovery Selecting a tape backup the database recovery process is the same as the one for a usual database recover performed by NSR-ORA (see also section “Recovery Until Time with Logical Errors”). If you specify a recovery using a snapshot NSR-ORA first tries to perform a switchlog of the most recently created log files and then stops the database and archivelog daemon. Subsequently NSR-ORA allows the administrator to perform the recovery using the snap restore command.
NSR-ORA and NetApp Recovery If you want NSR-ORA to copy the files (selection “1”) it will search for the directory with the most free space and will ask you whether the existing archivelog files should be copied to this filesystem. Additionally you may also specify a different directory. Later on, if there are redolog files required for the database recovery, NSR-ORA searches this directory for these redolog files before it tries to perform a backup from the NetWorker tape media.
NSR-ORA and NetApp Recovery Example 2: Recovery based on a specified snapshot Should I try to use a copy from the LAST SNAPSHOT or do you want to select a specific snapshot 1) last SNAPSHOT 2) select SNAPSHOT (default 1:) > 2 Please select one of the following SNAPSHOTS 1) Jul 31 04:03 nsrora_NET816_hour.1 2) Jul 31 00:03 nsrora_NET816_hour.2 3) Jul 30 23:03 nsrora_NET816_hour.3 4) Jul 30 20:03 nsrora_NET816_hour.4 5) Jul 30 16:03 nsrora_NET816_hour.5 6) Jul 29 23:03 nsrora_NET816_day.
Index ${ORACLE_SID}_full_save (directory) 37 A actual_saves_of_tablespaces (file) 18 amon 6, 9 daemon 10 display status of 11 figure 10 log file 13 on OPS systems 10 start 11 task of 10 threshold value of 10 AMON_GROUP shell parameter 34 AMON_INTERVALL shell parameter 33 AMON_MAX_LOGS shell parameter 32 AMON_MIN_LOGS shell parameter 32 AMON_MIRROR_GROUP shell parameter 35 AMON_MIRROR_SERVER shell parameter 33 AMON_RM_WITHOUT_MIRROR_D ELAY shell parameter 35 AMON_SAVE_ARG_NR shell parameter 35 AMON_WATCH_DEL
Index (configuration file) 17 C command nsrndmp_save 70 nsrora_rec 45, 50 ora_recut (for NetApp) 72 components backup component 14 of NSR-ORA 9 recovery component 45 COMPRESS_LEVEL shell parameter 35 config.sh output 27 config.sh (configuration tool) 27, 36 configuration backup component 17 configuration tool (config.
Index on OPS clusters 40 L LAST_WEEK_DAY shell parameter 62 Licensing snaprestore (NetApp) 23 licensing NetApp licenses required 23 logical database structure 4, 6 M MIRROR shell parameter 33 N NDMP 57 NDMP_LOGIN_METHOD shell parameter 62, 63 NetApp backups 70 configuration of NSR-ORA 57 configure_nsrora 59 crash recovery 74 licenses required 23 recover until time 72 recovery 72 snaprestore (License) 23 NetApp backups backup level 70 NetWorker ressources 66 predefined scenarios 63 recommendations 59 sav
Index configuration 40 installation on 40 remarkable things 40 OPS_INSTANCES shell parameter 34 ora_recut (command) for NetApp 72 ORACLE_GROUP shell parameter 31 ORACLE_HOME shell parameter 31 ORACLE_OWNER shell parameter 31 ORACLE_SID shell parameter 31 P parameter file 4 partial backup 36 physical database structure protocol files 18 for backup 18 under OPS 55 redolog files 4 loss of 7 restore (on OPS) 54 restore 6 redolog files (OPS) 54 RSH shell parameter 63 4, 6 R recover until time 72 recover until
Index NSR_INST 31 NSR_MAX_REC_DEV 34 NSR_MAX_RECOVER 34 NSR_SERVER 31 OPS 34 OPS_INSTANCES 34 ORACLE_GROUP 31 ORACLE_HOME 31 ORACLE_OWNER 31 ORACLE_SID 31 RSH 63 SEND_MAIL_TO 33 TELNET 63 shell script saveinfo.