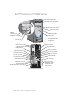
Dell™ Dimension™ 8400 Series CD or DVD activity light CD or DVD drive eject button floppy drive eject button* floppy drive light* USB 2.0 connectors (2) hard drive light power button headphone connector *On computers with a floppy drive.
Notes, Notices, and Cautions NOTE: A NOTE indicates important information that helps you make better use of your computer. NOTICE: A NOTICE indicates either potential damage to hardware or loss of data and tells you how to avoid the problem. CAUTION: A CAUTION indicates a potential for property damage, personal injury, or death. If you purchased a Dell™ n Series computer, any references in this document to Microsoft® Windows® operating systems are not applicable.
Contents Finding Information 1 . . . . . . . . . . . . . . . . . . . . . . . . . . . . 9 Setting Up and Using Your Computer Setting Up a Printer . . . . . . . . . . . . . . . . . . . . . . . . . . . . Connecting to the Internet . . . . . . . . . . . . . . . . . . . . . . . . . . . . . . . . . . . . . . . . . . . . . . 13 . . . . . . . . . . . . . . . . . . . . . . . . . . . . . . . . . . . . . . . . . . . . . . . . . . . . . . . . . . . . 14 . . . . . . . . . . . . . . . . . . . . . . . . . . .
Power Management . . . . . . . . . . . . . . . . . . . . . . . . . . . . Hyper-Threading . 2 . . . . . . . . . . . . . . . . . . . . . . . . . . . . . . . . . . . . . . . . . . . . . . . . . . . . 31 . . . . . . . . . . . . . . . . . . . . . . . . . . . . . . . . . . . . . . . . . . . . . . . . . . . . . . . . . . . . . . . . . . . . . Solving Problems Troubleshooting Tips . Battery Problems . . . . . . . . . . . . . . . . . . . . . . . . . . . 33 . . . . . . . . . . . . . . . . . . . . . . . . .
Scanner Problems . . . . . . . . . . . . . . . . . . . . . . . . . . . . . Sound and Speaker Problems . . . . . . . . . . . . . . . . . . . . . . . 45 46 . . . . . . . . . . . . . . . . . . . . . . . 46 . . . . . . . . . . . . . . . . . . . . . . . . . . . . . . . . . . . . . . . . . . 46 47 Diagnostic Lights . . . . . . . . . . . . . . . . . . . . . . . . . . . . . 49 Dell Diagnostics . . . . . . . . . . . . . . . . . . . . . . . . . . . . . . 52 If the screen is blank . . . . .
Inside Your Computer . . . . . . . . . . . . . . . . . . . . . . . . . . . System Board Components . Memory . . . . . . . . . . . . . . . . . . . . . . . . . 71 . . . . . . . . . . . . . . . . . . . . . . . . . . . . . . . . . 72 . . . . . . . . . . . . . 72 73 73 75 . . . . . . . . . . . . . . . . . . . . . . . . . . . . . . . . . . . 75 DDR2 Memory Overview . . . . . . . . . . . Addressing Memory With 4-GB Configurations Installing Memory . . . . . . . . . . . . . . Removing Memory . . . . . .
5 Appendix Specifications . System Setup . . . . . . . . . . . . . . . . . . . . . . . . . . . . . 107 . . . . . . . . . . . . . . . . . . . . . . . . . . . . . . 111 Overview . . . . . . . Entering System Setup. System Setup Options . Boot Sequence . . . . . . . . . . . . . . . . . . . . . . . . . . . . . . . . . . . . . . . . . . . . . . . . . . . . . . . . . . . . . . . . . . . . . . . . . . . . . . . . . . . . . . . . . . . . . . . . 111 112 113 116 . . . . . . . . . . . . . . . . . . . . . .
Contents
Finding Information What Are You Looking For? Find it Here • • • • • Dell™ Product Information Guide Warranty information Safety instructions Regulatory information Ergonomics information End User License Agreement • How to set up my computer Setup Diagram Finding Information 9
www.dell.com | support.dell.com What Are You Looking For? Find it Here • Service Tag and Express Service Code • Microsoft Windows License Label Service Tag and Microsoft Windows License These labels are located on your computer. • Use the Service Tag to identify your computer when you use support.dell.com or contact technical support. • Enter the Express Service Code to direct your call when contacting technical support. The Express Service Code is not available in all countries.
Setting Up and Using Your Computer Setting Up a Printer NOTICE: Complete the operating system setup before you connect a printer to the computer. See the documentation that came with the printer for setup information, including how to: • Obtain and install updated drivers. • Connect the printer to the computer. • Load paper and install the toner or ink cartridge. • Contact the printer manufacturer for technical assistance.
www.dell.com | support.dell.com USB connector on computer USB printer cable USB connector on printer Connecting a Parallel Printer 1 Complete the operating system setup, if you have not already done so. 2 Turn off the computer (see page 59). NOTICE: For best results, use a 3-m (10-ft) or shorter parallel cable. 3 12 Attach the parallel printer cable to the parallel connector on the computer and tighten the two screws.
parallel connector on computer connector on printer screws (2) clips (2) parallel printer cable notches (2) 4 Turn on the printer and then turn on the computer. If the Add New Hardware Wizard window appears, click Cancel. 5 Install the printer driver if necessary. See the documentation that came with your printer. Connecting to the Internet NOTE: ISPs and ISP offerings vary by country.
www.dell.com | support.dell.com Setting Up Your Internet Connection To set up an AOL or MSN connection: 1 Save and close any open files, and exit any open programs. 2 Double-click the MSN Explorer or AOL icon on the Microsoft® Windows® desktop. 3 Follow the instructions on the screen to complete the setup. If you do not have an MSN Explorer or AOL icon on your desktop or if you want to set up an Internet connection with a different ISP: 1 Save and close any open files, and exit any open programs.
Playing CDs or DVDs NOTICE: Do not press down on the CD or DVD tray when you open or close it. Keep the tray closed when you are not using the drive. NOTICE: Do not move the computer when you are playing CDs or DVDs. 1 Press the eject button on the front of the drive. 2 Place the disc, label side up, in the center of the tray. 3 Press the eject button or gently push in the tray. To format CDs for storing data, to create music CDs, or to copy CDs, see the CD software that came with your computer.
www.dell.com | support.dell.com Stop. Go to the previous track. Eject. Go to the next track. A DVD player includes the following basic buttons: Stop. Restart the current chapter. Play. Fast forward. Pause. Fast reverse. Advance a single frame while in pause mode. Go to the next title or chapter. Continuously play the current title or chapter. Go to the previous title or chapter. Eject. For more information on playing CDs or DVDs, click Help on the CD or DVD player (if available).
Adjusting the Picture If an error message notifies you that the current resolution and color depth are using too much memory and preventing DVD playback, adjust the display properties. 1 Click the Start button and click Control Panel. 2 Under Pick a category, click Appearance and Themes. 3 Under Pick a task..., click Change the screen resolution. 4 In the Display Properties window, click and drag the bar in Screen resolution to change the setting to 800 by 600 pixels.
www.dell.com | support.dell.com 4 To copy the CD or DVD: • If you have one CD or DVD drive, ensure that the settings are correct and click Copy. The computer reads your source CD or DVD and copies it to a temporary folder on your computer hard drive. When prompted, insert a blank CD or DVD into the CD or DVD drive and click OK. • If you have two CD or DVD drives, select the drive into which you have inserted your source CD or DVD and click Copy.
Connecting Two Monitors CAUTION: Before you begin any of the procedures in this section, follow the safety instructions located in the Product Information Guide. NOTE: If you are connecting two monitors that have VGA connectors, you must have the optional DVI adapter. If you are connecting two flat-panel monitors, at least one of them must have a VGA connector. If you are connecting a TV, you may connect only one monitor (VGA or DVI) in addition to the TV.
www.dell.com | support.dell.com Connecting One Monitor With a VGA connector and One Monitor With a DVI Connector 1 Follow the procedures in "Before You Begin" on page 59. 2 Connect the VGA connector on the monitor to the VGA (blue) connector on the back of the computer. 3 Connect the DVI connector on the other monitor to the DVI (white) connector on the back of the computer.
your computer, then each pair of drives can be made into RAID level 0 or RAID level 1 volumes. The drives should be the same size in order to ensure that the larger drive does not contain unallocated (and therefore unusable) space. NOTE: RAID levels do not represent a hierarchy. A RAID level 1 configuration is not inherently better or worse than a RAID level 0 configuration. RAID Level 0 RAID level 0 uses a storage technique known as "data striping" to provide a high data access rate.
www.dell.com | support.dell.com serial ATA RAID configured for RAID level 1 segment 1 segment 1 duplicated segment 2 segment 2 duplicated segment 3 segment 3 duplicated segment 4 segment 4 duplicated segment 5 segment 5 duplicated segment 6 segment 6 duplicated hard drive 1 hard drive 2 If a drive failure occurs, subsequent read and write operations are directed to the surviving drive. A replacement drive can then be rebuilt using the data from the surviving drive.
5 Use the left- and right-arrow keys to highlight Save/Exit, and press to exit system setup and resume the boot process. Configuring for RAID Using the Intel(R) Option ROM Utility NOTE: Although any size drives may be used to create a RAID configuration using the Intel Option ROM utility, ideally the drives should be of equal size. In a RAID level 0 configuration, the size of the array will be the size of the smallest disk multiplied by the number (two) of disks in the array.
www.dell.com | support.dell.com 4 Enter a RAID volume name or accept the default, and press . 5 Use the up- and down-arrow keys to select RAID1(Mirror), and press . 6 If there are more than two hard disks available, use the up- and down-arrow keys and space bar to select the two disks you want to use to make up your array, and then press . 7 Select the desired capacity for the volume, and press . The default value is the maximum available size.
Creating a RAID 0 Volume NOTE: When you perform this operation, all data on the RAID drives will be lost. 1 Set your computer to RAID-enabled mode (see page 22). 2 Click Start and point to Programs→ Intel(R) Application Accelerator→ Intel Application Accelerator to launch the Intel(R) Storage Utility. NOTE: If you do not see an Actions menu option, you have not yet set your computer to RAID-enabled mode (see page 22).
www.dell.com | support.dell.com Deleting a RAID Volume NOTE: While this procedure deletes the RAID 1 volume, it also splits the RAID 1 volume into two nonRAID hard drives with a partition, and leaves any existing data files intact. Deleting a RAID 0 volume, however, destroys all data on the volume. 1 Click the Start button and point to Programs→ Intel(R) Application Accelerator→ Intel Application Accelerator to launch the Intel(R) Storage Utility.
NOTE: In the following step, you will lose all data contained on the member drive. 11 Click Finish to start migrating, or click Back to make changes. You can use your computer normally during the migration process. Migrating to a RAID 1 Volume 1 Set your computer to RAID-enabled mode (see page 22). 2 Click the Start button and point to All Programs→ Intel(R) Application Accelerator→ Intel Application Accelerator to launch the Intel(R) Storage Utility.
www.dell.com | support.dell.com To Remove Spare Marking From a Spare Hard Drive: 1 Right-click the spare hard drive icon.
Network Setup Wizard The Microsoft® Windows® XP operating system provides a Network Setup Wizard to guide you through the process of sharing files, printers, or an Internet connection between computers in a home or small office. 1 Click the Start button, point to All Programs→ Accessories→ Communications, and then click Network Setup Wizard. 2 On the welcome screen, click Next. 3 Click Checklist for creating a network.
www.dell.com | support.dell.com Hibernate Mode Hibernate mode conserves power by copying system data to a reserved area on the hard drive and then completely turning off the computer. When the computer exits from hibernate mode, the desktop is restored to the state it was in before it entered hibernate mode. To activate hibernate mode: 1 Click the Start button and click Control Panel. 2 Under Pick a category, click Performance and Maintenance. 3 Under or pick a Control Panel icon, click Power Options.
• Presentation — If you want your computer to run without interruption (using no power conservation). • Minimal Power Management — If you want your computer to run with minimal power conservation. • Max Battery — If your computer is a portable computer and you run your computer from batteries for extended periods of time.
www.dell.com | support.dell.com (SP1) or later operating system because Windows XP is optimized to take advantage of Hyper-Threading technology. While many programs can benefit from Hyper-Threading, some programs have not been optimized for Hyper-Threading and may require an update from the software manufacturer. Contact the software manufacturer for updates and information about using Hyper-Threading with your software.
Solving Problems Troubleshooting Tips Follow these tips when you troubleshoot your computer: • If you added or removed a part before the problem started, review the installation procedures and ensure that the part is correctly installed. • If a peripheral device does not work, ensure that the device is properly connected. • If an error message appears on the screen, write down the exact message. This message may help technical support personnel diagnose and fix the problem(s).
www.dell.com | support.dell.com Drive Problems CAUTION: Before you begin any of the procedures in this section, follow the safety instructions located in the Product Information Guide. E N S U R E T H A T M I C R O S O F T ® W I N D O W S ® R E C O G N I Z E S T H E D R I V E — Click the Start button and click My Computer. If the floppy, CD, or DVD drive, is not listed, perform a full scan with your antivirus software to check for and remove viruses.
Problems writing to a CD/DVD-RW drive C L O S E O T H E R P R O G R A M S — The CD/DVD-RW drive must receive a steady stream of data when writing. If the stream is interrupted, an error occurs. Try closing all programs before you write to the CD/DVD-RW. TU R N O F F S T A N D B Y M O D E I N W I N D O W S B E F O R E W R I T I N G T O A C D / D V D - R W D I S C — See "Standby Mode" on page 29 or search for the keyword standby in Windows Help (see page 10) for information on power management modes.
www.dell.com | support.dell.com CHECK THE TELEPHONE LINE CONNECTION — CHECK THE TELEPHONE JACK — CONNECT THE MODEM DIRECTLY TO THE TELEPHONE WALL JACK — USE A DIFFERENT TELEPHONE LINE — • Verify that the telephone line is connected to the jack on the modem. (The jack has either a green label or a connector-shaped icon next to it.) • Ensure that you hear a click when you insert the telephone line connector into the modem. • Disconnect the telephone line from the modem and connect it to a telephone.
A F I L E N A M E C A N N O T C O N T A I N A N Y O F T H E F O L L O W I N G C H A R A C T E R S : \ / : * ? “ < > | — Do not use these characters in filenames. A R E Q U I R E D . D L L F I L E W A S N O T F O U N D — The program that you are trying to open is missing an essential file. To remove and then reinstall the program: 1 Click the Start button, click Control Panel, and then click Add or Remove Programs. 2 Select the program you want to remove. 3 Click the Change or Remove Program icon.
www.dell.com | support.dell.com I F Y O U H A V E P R O B L E M S W I T H A D E L L IEEE 1394 D E V I C E — Contact Dell (see page 123). I F Y O U H A V E P R O B L E M S W I T H A N O N -D E L L IEEE 1394 D E V I C E — Contact the manufacturer of the IEEE 1394 device. Keyboard Problems CAUTION: Before you begin any of the procedures in this section, follow the safety instructions located in the Product Information Guide.
The computer stops responding NOTICE: You might lose data if you are unable to perform an operating system shutdown. TU R N T H E C O M P U T E R O F F — If you are unable to get a response by pressing a key on your keyboard or moving your mouse, press and hold the power button for at least 8 to 10 seconds until the computer turns off. Then restart your computer. A program stops responding END THE PROGRAM — 1 Press simultaneously. 2 Click Applications.
www.dell.com | support.dell.com Other software problems CHECK THE SOFTWARE DOCUMENTATION OR CONTACT THE SOFTWARE MANUFACTURER FOR TROUBLESHOOTING INFORMATION — • Ensure that the program is compatible with the operating system installed on your computer. • Ensure that your computer meets the minimum hardware requirements needed to run the software. See the software documentation for information. • Ensure that the program is installed and configured properly.
IF YOU EXPERIENCE OTHER MEMORY PROBLEMS — • Reseat the memory modules (see page 73) to ensure that your computer is successfully communicating with the memory. • Ensure that you are following the memory installation guidelines (see page 73). • Your computer supports DDR2 memory. For more information about the type of memory supported by your computer, see "Memory" on page 107. • Run the Dell Diagnostics (see page 52).
www.dell.com | support.dell.com R E I N S T A L L T H E M O U S E D R I V E R — See page 55. R U N T H E H A R D W A R E TR O U B L E S H O O T E R — See page 58. Network Problems CAUTION: Before you begin any of the procedures in this section, follow the safety instructions located in the Product Information Guide. C H E C K T H E N E T W O R K C A B L E C O N N E C T O R — Ensure that the network cable is firmly inserted into both the network connector on the back of the computer and the network jack.
I F T H E P O W E R L I G H T I S O F F — The computer is either turned off or is not receiving power. • Reseat the power cable into both the power connector on the back of the computer and the electrical outlet. • If the computer is plugged into a power strip, ensure that the power strip is plugged into an electrical outlet and that the power strip is turned on. Also bypass power protection devices, power strips, and power extension cables to verify that the computer turns on properly.
www.dell.com | support.dell.com CHECK THE PRINTER CABLE CONNECTIONS — • See the printer documentation for cable connection information. • Ensure that the printer cables are securely connected to the printer and the computer (see page 11). TE S T T H E E L E C T R I C A L O U T L E T — Ensure that the electrical outlet is working by testing it with another device, such as a lamp.
VE R I F Y T H A T T H E S C A N N E R I S R E C O G N I Z E D B Y M I C R O S O F T W I N D O W S — 1 Click the Start button, click Control Panel, and then click Printers and Other Hardware. 2 Click Scanners and Cameras. If your scanner is listed, Windows recognizes the scanner. R E I N S T A L L T H E S C A N N E R D R I V E R — See the scanner documentation for instructions.
www.dell.com | support.dell.com RUN THE SPEAKER DIAGNOSTICS R E I N S T A L L T H E S O U N D D R I V E R — See page 55. R U N T H E H A R D W A R E TR O U B L E S H O O T E R — See page 58. No sound from headphones C H E C K T H E H E A D P H O N E C A B L E C O N N E C T I O N — Ensure that the headphone cable is securely inserted into the headphone connector (see page 61).
TE S T T H E E L E C T R I C A L O U T L E T — Ensure that the electrical outlet is working by testing it with another device, such as a lamp. C H E C K T H E D I A G N O S T I C L I G H T S — See page 49. If the screen is difficult to read C H E C K T H E M O N I T O R S E T T I N G S — See the monitor documentation for instructions on adjusting the contrast and brightness, demagnetizing (degaussing) the monitor, and running the monitor self-test.
Solving Problems www.dell.com | support.dell.
Advanced Troubleshooting Diagnostic Lights CAUTION: Before you begin any of the procedures in this section, follow the safety instructions located in the Product Information Guide. To help you troubleshoot a problem, your computer has four lights labeled "A," "B," "C," and "D" on the back panel (see page 63). The lights can be yellow or green. When the computer starts normally, the lights flash. After the computer starts, all four lights display solid green.
www.dell.com | support.dell.com Light Pattern Problem Description Suggested Resolution Memory modules are detected, but a memory failure has occurred. • If you have two or more memory modules installed, remove the modules, reinstall one module (see page 73), and then restart the computer. If the computer starts normally, reinstall an additional module. Continue until you have identified a faulty module or reinstalled all modules without error.
Light Pattern Problem Description Suggested Resolution No memory modules are detected. • If you have two or more memory modules installed, remove the modules, reinstall one module (see page 73), and then restart the computer. If the computer starts normally, reinstall an additional module. Continue until you have identified a faulty module or reinstalled all modules without error. • If available, install properly working memory of the same type into your computer (see page 73).
www.dell.com | support.dell.com Light Pattern Problem Description Suggested Resolution Another failure has occurred. • Ensure that the cables are properly connected to the system board from the hard drive, CD drive, and DVD drive (see page 99). • If there is an error message on your screen identifying a problem with a device (such as the floppy drive or hard drive), check the device to make sure it is functioning properly.
4 When the Dell Diagnostics Main Menu appears, select the test you want to run (see page 53). Dell Diagnostics Main Menu 1 2 After the Dell Diagnostics loads and the Main Menu screen appears, click the button for the option you want. Option Function Express Test Performs a quick test of devices. This test typically takes 10 to 20 minutes and requires no interaction on your part. Run Express Test first to increase the possibility of tracing the problem quickly.
www.dell.com | support.dell.com Tab Function Configuration Displays your hardware configuration for the selected device. The Dell Diagnostics obtains configuration information for all devices from system setup, memory, and various internal tests, and it displays the information in the device list in the left pane of the screen. The device list may not display the names of all the components installed on your computer or all devices attached to your computer.
5 Click Device Manager. 6 Scroll down the list to see if any device has an exclamation point (a yellow circle with a [!]) on the device icon. If an exclamation point is next to the device name, you may need to reinstall the driver or install a new driver (see page 55). Reinstalling Drivers NOTICE: The Dell Support website at support.dell.com provides approved drivers for Dell™ computers. If you install drivers obtained from other sources, your computer might not work correctly.
www.dell.com | support.dell.com Restoring Your Operating System You can restore your operating system in the following ways: • Microsoft Windows XP System Restore returns your computer to an earlier operating state without affecting data files. • Dell PC Restore by Symantec restores your hard drive to the operating state it was in when you purchased the computer. Dell PC Restore permanently deletes all data on the hard drive and removes any applications installed after you received the computer.
4 Select a restore point and click Next. If a calendar date has only one restore point, then that restore point is automatically selected. If two or more restore points are available, click the restore point that you prefer. 5 Click Next. The Restoration Complete screen appears after System Restore finishes collecting data and then the computer restarts. 6 After the computer restarts, click OK.
www.dell.com | support.dell.com 4 On the next screen, click Confirm. The restore process takes approximately 6–10 minutes to complete. 5 When prompted, click Finish to reboot the computer. NOTE: Do not manually shut down the computer. Click Finish and let the computer completely reboot. 6 When prompted, click Yes. The computer restarts.
Removing and Installing Parts Before You Begin This chapter provides procedures for removing and installing the components in your computer. Unless otherwise noted, each procedure assumes that the following conditions exist: • You have performed the steps in "Turning Off Your Computer" (see page 59) and "Before Working Inside Your Computer" (see page 60). • You have read the safety information in your Dell™ Product Information Guide.
www.dell.com | support.dell.com Before Working Inside Your Computer Use the following safety guidelines to help protect your computer from potential damage and to help ensure your own personal safety. CAUTION: Before you begin any of the procedures in this section, follow the safety instructions located in the Product Information Guide. CAUTION: Handle components and cards with care. Do not touch the components or contacts on a card. Hold a card by its edges or by its metal mounting bracket.
Front View 1 2 3* 10 4* 5 9 6 8 7 *On computers with a floppy drive. 1 CD or DVD drive-activity light The drive light is on when the computer reads data from the CD or DVD drive. 2 CD or DVD drive eject button Press to eject a disc from the CD or DVD drive. 3 floppy-drive eject button Press to eject a floppy disk from the floppy drive. (On computers with an optional floppy drive.
www.dell.com | support.dell.com 6 power button Press to turn on the computer. NOTICE: To avoid losing data, do not use the power button to turn off the computer. Instead, perform an operating system shutdown. 7 Service Tag Used to identify your computer when you access the Dell Support website or call technical support. 8 headphone connector Use the headphone connector to attach headphones and most kinds of speakers. 9 USB 2.
Back View 1 2 3 4 20 5 6 7 19 18 8* 17 9 16 10* 15 11 14 13 12* *Not present on all computers. 1 power connector Insert the power cable. 2 voltage selection switch (may not be available on all computers) See the safety instructions located in the Product Information Guide for more information. 3 parallel connector Connect a parallel device, such as a printer, to the parallel connector. If you have a USB printer, plug it into a USB connector.
www.dell.com | support.dell.com 6 surround connector Use the black surround connector to attach multichannel-capable speakers. 7 line-in connector Use the blue line-in connector to attach a record/playback device such as a cassette player, CD player, or VCR. On computers with a sound card, use the connector on the card. On computers with a sound card, use the connector on the card. 8 TV-OUT connector Connects your computer to a TV. For more information, see "Connecting to the Internet" on page 13.
14 network adapter connector To attach your computer to a network or broadband device, connect one end of a network cable to either a network jack or your network or broadband device. Connect the other end of the network cable to the network adapter connector on your computer. A click indicates that the network cable has been securely attached. NOTE: Do not plug a telephone cable into the network connector. On computers with a network connector card, use the connector on the card.
www.dell.com | support.dell.com 4 Remove the front-panel insert above the door bay area by pulling the bottom of the insert with your fingers. front-panel insert use fingers to pull here 66 5 Lift both hinge arms to the horizontal position. 6 Use the two view slots to align the pivot bar with the two pivot-bar slots.
view slots (2) pivot-bar slots (2) pivot bar hinge arms (2) in horizontal position NOTICE: Before touching anything inside your computer, ground yourself by touching an unpainted metal surface, such as the metal at the back of the computer. While you work, periodically touch an unpainted metal surface to dissipate any static electricity that could harm internal components. 7 Pull the arms toward you until they snap into position.
www.dell.com | support.dell.com Reattaching the Front Door CAUTION: Before you begin any of the procedures in this section, follow the safety instructions located in the Product Information Guide. 1 Follow the procedures in "Before You Begin" on page 59. 2 Disconnect the computer power cable from the electrical outlet. 3 Lower the hinge arms to the vertical position. 4 Align the two clips on the inside of the front door with the two hinge arms.
Opening the Computer Cover CAUTION: Before you begin any of the procedures in this section, follow the safety instructions located in the Product Information Guide. CAUTION: To guard against electrical shock, always unplug your computer from the electrical outlet before opening the cover. 1 Follow the procedures in "Before You Begin" on page 59. NOTICE: Ensure that sufficient space exists to support the open cover—at least 30 cm (1 ft) of desk top space.
www.dell.com | support.dell.com Inside Your Computer CAUTION: Before you begin any of the procedures in this section, follow the safety instructions located in the Product Information Guide. Follow the procedures in "Before You Begin" on page 59. floppy drive* hard drive CD/DVD drive power supply system board * On computers with a floppy drive.
System Board Components SATA connectors (SATA-O, SATA-1, SATA-2, SATA-3) password jumper (PASS) IDE drive connector (PRI IDE) hard-drive activity light for add-in cards (SCSI LED) front-panel connector (FRONT PANEL) floppy drive connector (FLOPPY) internal speaker (SPKR) standby power light (AUX_PWR) card fan connector (PCI FAN) clear CMOS jumper (CLR CMOS) main power connector (POWER) memory module connectors (1, 2, 3, 4) battery socket (BATTERY) processor fan connector (CPU FAN) PCI Express x16
www.dell.com | support.dell.com Memory You can increase your computer memory by installing memory modules on the system board. Your computer supports DDR2 memory. For additional information on the type of memory supported by your computer, see "Memory" on page 107. DDR2 Memory Overview DDR2 memory modules should be installed in pairs of matched memory size, speed, and technology.
matched pair of memory modules in DIMM connectors 1 and 2 (white securing clips) matched pair of memory modules in DIMM connectors 3 and 4 (black securing clips) NOTE: Memory purchased from Dell is covered under your computer warranty. NOTICE: If you remove your original memory modules from the computer during a memory upgrade, keep them separate from any new modules that you may have, even if you purchased the new modules from Dell.
www.dell.com | support.dell.com memory connector closest to processor securing clips (2) connector 4 Align the notch on the bottom of the module with the crossbar in the connector. notch memory module cutouts (2) crossbar NOTICE: To avoid damage to the memory module, press the module straight down into the connector while you apply equal force to each end of the module. 5 Insert the module into the connector until the module snaps into position.
6 Close the computer cover. NOTICE: To connect a network cable, first plug the cable into the network device and then plug it into the computer. 7 Connect your computer and devices to electrical outlets, and turn them on. 8 Right-click the My Computer icon and click Properties. 9 Click the General tab. 10 To verify that the memory is installed correctly, check the amount of memory (RAM) listed.
www.dell.com | support.dell.com Your Dell™ computer provides the following slots for PCI and PCI Express cards: • Three PCI card slots • One PCI Express x16 card slot • One PCI Express x1 card slot PCI Cards If you are installing or replacing a card, follow the procedures in the next section. If you are removing but not replacing a PCI card, see "Removing a PCI Card" on page 80. If you are replacing a card, remove the current driver for the card from the operating system.
lever PCI card retention arm edge connector filler bracket card connector 3 If you are installing a new card, remove the filler bracket to create a card-slot opening. Then continue with step 5. 4 If you are replacing a card that is already installed in the computer, remove the card. If necessary, disconnect any cables connected to the card. Grasp the card by its top corners, and ease it out of its connector. 5 Prepare the card for installation.
www.dell.com | support.dell.com not fully seated card fully seated card bracket within slot bracket caught outside of slot 7 8 78 Before you lower the retention arm, ensure that: • The tops of all cards and filler brackets are flush with the alignment bar. • The notch in the top of the card or filler bracket fits around the alignment guide. Press the retention arm into place, securing the card(s) in the computer.
retention arm alignment guide alignment bar filler bracket NOTICE: Do not route card cables over or behind the cards. Cables routed over the cards can prevent the computer cover from closing properly or cause damage to the equipment. 9 Connect any cables that should be attached to the card. See the documentation for the card for information about the card’s cable connections. NOTICE: To connect a network cable, first plug the cable into the network device and then plug it into the computer.
www.dell.com | support.dell.com 12 13 If you installed an add-in network adapter and want to disable the integrated network adapter: a Enter system setup (see page 111), select Network Controller, and then change the setting to Off. b Connect the network cable to the add-in network adapter’s connectors. Do not connect the network cable to the integrated connector on the back panel. Install any drivers required for the card as described in the card documentation.
PCI Express Cards Your computer supports one PCI Express x16 card and one PCI Express x1 card. NOTICE: PCI Express graphics card that run higher than 75 W require an additional cooling fan. Otherwise, your card could overheat and damage your computer. If a card fan is not present in your computer and you are installing a graphics card that runs at 75 W or higher, contact Dell (see page 123) to find out how to purchase a card fan.
www.dell.com | support.dell.
3 If you are installing a new card, remove the filler bracket to create a card-slot opening. Then continue with step 5. 4 If you are replacing a card that is already installed in the computer, remove the card. If necessary, disconnect any cables connected to the card. If your card includes a retention mechanism, remove the top of the retention mechanism by pressing the tab and pulling up on the top. Gently pull the securing tab, grasp the card by its top corners, and then ease it out of its connector.
www.dell.com | support.dell.com 9 10 Before you lower the retention arm, ensure that: • The tops of all cards and filler brackets are flush with the alignment bar. • The notch in the top of the card or filler bracket fits around the alignment guide. Press the retention arm into place, securing the card(s) in the computer. retention arm alignment guide alignment bar filler bracket NOTICE: Do not route card cables over or behind the cards.
14 15 16 If you installed a sound card: a Enter system setup (see page 111), select Audio Controller, and then change the setting to Off. b Connect external audio devices to the sound card’s connectors. Do not connect external audio devices to the microphone, speaker/headphone, or line-in connectors on the back panel.
www.dell.com | support.dell.com 10 11 12 If you removed a sound card: a Enter system setup (see page 111), select Audio Controller, and then change the setting to On. b Connect external audio devices to the audio connectors on the back panel of the computer. If you removed an add-in network connector: a Enter system setup (see page 111), select Network Controller, and then change the setting to On. b Connect the network cable to the integrated connector on the back panel of the computer.
card fan bracket top edge of card fan bracket hooks on inside of computer cover 3 Slide the card fan bracket onto the hooks on the inside of the computer cover.
www.dell.com | support.dell.com 4 Press the top edge of the card fan bracket toward the computer cover until it clicks. card fan bracket top edge of card fan bracket cabling slot card fan cable card fan connector on system board 5 Route the card fan cable through the cabling slots. 6 Plug the card fan cable into the card fan connector (PCI FAN) on the system board (see page 71).
Drives Your computer supports a combination of these devices: • Up to two hard drives • One optional floppy drive • One optional Zip drive • Up to two CD or DVD drives General Installation Guidelines Connect serial ATA hard drives to the system board connectors labeled SATA-0, SATA-1, SATA-2, or SATA-3. Connect CD/DVD drives to the connector labeled PRI IDE.
www.dell.com | support.dell.com Most interface connectors are keyed for correct insertion; that is, a notch or a missing pin on one connector matches a tab or a filled-in hole on the other connector. When you connect an IDE cable, ensure that you align the colored stripe with the pin 1 connector. When you disconnect an IDE cable, grasp the colored pull tab and pull until the connector detaches. When you connect and disconnect a serial ATA cable, hold the cable by the connector at each end.
Removing a Hard Drive 1 Disconnect the power and data cable from the drive and from the system board. 2 Press in on the tabs on each side of the drive and slide the drive up and out.
www.dell.com | support.dell.com Installing a Hard Drive 1 Unpack the replacement hard drive, and prepare it for installation. 2 Check the documentation for the drive to verify that it is configured for your computer. 3 If your replacement hard drive does not have the bracket rails attached, remove the rails from the old drive by removing the two screws that secure each rail to the drive.
6 Check all connectors to be certain that they are properly cabled and firmly seated. 7 Close the computer cover (see page 104). NOTICE: To connect a network cable, first plug the cable into the network device and then plug it into the computer. 8 Connect your computer and devices to electrical outlets, and turn them on. See the documentation that came with the drive for instructions on installing any software required for drive operation.
www.dell.com | support.dell.com 6 c Gently slide the first hard drive into the lower bay until you hear a click. d Reconnect the power and data cable to the back of the first hard drive. Gently slide the new hard drive into the upper bay until you hear a click. rail tabs (2) second hard drive in upper bay first hard drive in lower bay hard drive bay 7 Connect a power cable to the drive. 8 Connect the data cable to the drive and to the system board (see page 71).
insert release tab 4 From the outside of the computer, pull the insert away from the computer’s front panel. 5 Remove the insert from the insert frame by pressing on the four tabs.
www.dell.com | support.dell.com insert frame for floppy drive bay insert frame for CD/DVD drive bay 6 Reattach the empty insert frame over the front of the drive bay (the insert frame fits only one way): a Face the front of the computer and slip the left side of the insert in to the left side of the drive bay opening. b Slightly press the right-side insert release tab and gently push in the insert.
Floppy Drive CAUTION: Before you begin any of the procedures in this section, follow the safety instructions located in the Product Information Guide. CAUTION: To guard against electrical shock, always unplug your computer from the electrical outlet before opening the cover. Follow the procedures in "Before You Begin" on page 59. NOTE: If you are adding a floppy drive, see "Installing a Floppy Drive" on page 98.
www.dell.com | support.dell.com Installing a Floppy Drive 1 If you are replacing a drive and the new drive does not have the bracket rails attached, remove the rails from the old drive by removing the two screws that secure each rail to the drive. Attach the bracket to the new drive by aligning the screw holes on the drive with the screw holes on the bracket rails and then inserting and tightening all four screws (two screws on each rail).
5 If you are installing a new floppy drive rather than replacing a drive, remove the front-panel inserts (see page 94). 6 Check all cable connections, and fold cables out of the way to provide airflow for the fan and cooling vents. 7 Close the computer cover. (see page 104). NOTICE: To connect a network cable, first plug the cable in to the network device and then plug it in to the computer. 8 Connect your computer and devices to their electrical outlets, and turn them on.
www.dell.com | support.dell.com Removing a CD/DVD Drive 1 Follow the procedures in "Before You Begin" on page 59. 2 Disconnect the power and data cables from the back of the drive. power cable data cable 3 100 Press inward on the two tabs on the sides of the drive, and then slide the drive upward and remove it from the drive bay.
Installing a CD/DVD Drive 1 If you are installing a new drive, unpack the drive and prepare it for installation. Check the documentation that accompanied the drive to verify that the drive is configured for your computer. If you are installing an IDE drive, configure the drive for the cable select setting. 2 Connect the new drive to the set of rails that are attached to the inside of the cover. If a set of rails is not attached inside the cover, contact Dell (see page 123).
www.dell.com | support.dell.com drive bracket rails (2) screws (4) 4 Gently slide the drive into place until the tabs securely click into position. 5 Connect the power and data cables to the drive. power cable data cable 102 6 If you are installing a new CD/DVD drive rather than replacing a drive, remove the frontpanel inserts (see page 94). 7 Check all cable connections, and fold cables out of the way to provide airflow for the fan and cooling vents.
8 Close the computer cover (see page 104). NOTICE: To connect a network cable, first plug the cable in to the network device and then plug it in to the computer. 9 Connect your computer and devices to their electrical outlets, and turn them on. See the documentation that came with the drive for instructions on installing any software required for drive operation. 10 Enter system setup (see page 111) and select the appropriate Drive option.
www.dell.com | support.dell.com 5 Insert the new battery into the socket with the side labeled "+" facing up, and snap the battery into place. battery battery socket tab 6 Close the computer cover (see page 104). NOTICE: To connect a network cable, first plug the cable into the network device and then plug it into the computer. 7 Connect your computer and devices to electrical outlets, and turn them on. 8 Enter system setup (see page 111) and restore the settings you recorded in step 1.
NOTICE: To connect a network cable, first plug the cable into the network device and then plug it into the computer. 4 Connect your computer and devices to electrical outlets, and turn them on.
www.dell.com | support.dell.
Appendix Specifications Processor Processor type Intel® Pentium® 4 with HT Technology NOTE: Not all Pentium 4 processors support Hyper-Threading technology. Cache 512 KB, 1 MB, or 2 MB Memory Type 400- and 533-MHz DDR2 unbuffered SDRAM Memory connectors four Memory capacities 256 MB, 512 MB, or 1 GB, non-ECC Minimum memory 256 MB Maximum memory 4 GB NOTE: See "Addressing Memory With 4-GB Configurations" on page 73 to verify the amount of memory available to the operating system.
www.dell.com | support.dell.com Audio Type ADI 1980 AC97 Codec NOTE: This audio type is present only on computers with integrated sound capabilities. Expansion Bus Bus type Bus speed PCI 2.
Drives Externally accessible: two 3.5-inch drive bays two 5.
www.dell.com | support.dell.com Controls and Lights Power control push button Power light green light — Blinking green in sleep state; solid green for power-on state. amber light — Blinking amber indicates a problem with an installed device; solid amber indicates an internal power problem (see "Power Problems" on page 42). Hard-drive access light green Link integrity light (on integrated network adapter) green light — A good connection exists between a 10-Mbps network and the computer.
Environmental Temperature: Operating 10° to 35°C (50° to 95°F) NOTE: At 35°C (95°F), the maximum operating altitude is 914 m (3000 ft). Storage Relative humidity –40° to 65°C (–40° to 149°F) 20% to 80% (noncondensing) Maximum vibration: Operating 0.25 G at 3 to 200 Hz at 0.5 octave/min Storage 0.5 G at 3 to 200 Hz at 1 octave/min Maximum shock: Operating bottom half-sine pulse with a change in velocity of 20 inches/sec (50.
www.dell.com | support.dell.com Entering System Setup 1 Turn on (or restart) your computer. 2 When the blue DELL™ logo appears, press immediately. If you wait too long and the operating system logo appears, continue to wait until you see the Microsoft® Windows® desktop. Then shut down your computer (see page 59) and try again. System Setup Screens The system setup screen displays current or changeable configuration information for your computer.
System Setup Options NOTE: Depending on your computer and installed devices, the items listed in this section may not appear, or may not appear exactly as listed. System System Info Lists system information such as the computer name, the BIOS version number and date, system tags, and other system-specific information. CPU Info Identifies whether the computer’s processor supports Hyper-Threading and lists the processor bus speed, processor ID, clock speed, and L2 cache.
www.dell.com | support.dell.com LPT Port Mode Identifies and defines the parallel port settings. You can set the parallel port to Off, AT, PS/2, EPP, or ECP. LPT Port Address Identifies the address for the parallel port. LPT Port DMA Identifies and defines the parallel port DMA settings. You can set the parallel port DMA to Off, DMA1, or DMA3. Serial Port #1 Identifies and defines the serial port settings.
Auto Power On Sets the computer to automatically turn on. Choices are every day or every Monday through Friday. The default setting is Off. This feature does not work if you turn off your computer using a power strip or surge protector. Auto Power Time Sets time to automatically turn on the computer. Time is kept in a 24-hour format (hours:minutes). Change the start-up time by pressing the right- or left-arrow key to increase or decrease the numbers, or type numbers in both the date and time fields.
www.dell.com | support.dell.com POST Hotkeys This option allows you to specify the function keys to display on the screen when the computer starts. Keyboard Errors This option disables or enables keyboard error reporting when the computer starts. Boot Sequence This feature allows you to change the boot sequence for devices. Option Settings • Diskette Drive — The computer attempts to boot from the floppy drive.
4 At the bottom of the menu, enter the number of the device that is to be used for the current boot only. For example, if you are booting to a USB memory key, highlight USB Flash Device and press . NOTE: To boot to a USB device, the device must be bootable. To make sure your device is bootable, check the device documentation. Changing Boot Sequence for Future Boots 1 Enter system setup (see page 112).
www.dell.com | support.dell.com PASS CLR CMOS (page 119) 2 Locate the 3-pin password jumper (PASS) on the system board (see page 71), and attach the jumper plug to pins 2 and 3 to clear the password. NOTE: When you receive your computer, the jumper plug is attached to pins 1 and 2. 3 Close the computer cover (see page 104). 4 Connect your computer and monitor to electrical outlets, and turn them on.
Clearing CMOS Settings CAUTION: Before you begin any of the procedures in this section, follow the safety instructions located in the Product Information Guide. 1 Follow the procedures in "Before You Begin" on page 59. 2 Reset the current CMOS settings: 3 a Locate the 3-pin CMOS jumper (CLR CMOS) on the system board (see page 71). b Remove the jumper plug from pins 2 and 3. c Place the jumper plug on pins 1 and 2 and wait approximately 5 seconds. d Replace the jumper plug on pins 2 and 3.
www.dell.com | support.dell.com 2 Wipe the ball with a clean, lint-free cloth. 3 Blow carefully into the ball cage to dislodge dust and lint. 4 If the rollers inside the ball cage are dirty, clean the rollers with a cotton swab moistened lightly with isopropyl alcohol. 5 Recenter the rollers in their channels if they are misaligned. Ensure that fluff from the swab is not left on the rollers. 6 Replace the ball and retainer ring, and turn the retainer ring clockwise until it clicks into place.
Dell provides limited technical support for the computer and any "Dell-installed" software and peripherals1. Support for third-party software and peripherals is provided by the original manufacturer, including those purchased and/or installed through Dell Software and Peripherals, Readyware, and Custom Factory Integration2. 1 2 Repair services are provided pursuant to the terms and conditions of your limited warranty and any optional support service contract purchased with the computer.
www.dell.com | support.dell.com This device must accept any interference received, including interference that may cause undesired operation. Class A This equipment has been tested and found to comply with the limits for a Class A digital device pursuant to Part 15 of the FCC Rules. These limits are designed to provide reasonable protection against harmful interference when the equipment is operated in a commercial environment.
Contacting Dell To contact Dell™ electronically, you can access the following websites: • www.dell.com • support.dell.com (technical support) • premiersupport.dell.com (technical support for educational, government, healthcare, and medium/large business customers, including Premier, Platinum, and Gold customers) For specific web addresses for your country, find the appropriate country section in the table below. NOTE: Toll-free numbers are for use within the country for which they are listed.
www.dell.com | support.dell.com Country (City) International Access Code Country Code City Code Australia (Sydney) Department Name or Service Area, Website and E-Mail Address Area Codes, Local Numbers, and Toll-Free Numbers E-mail (Australia): au_tech_support@dell.com International Access Code: 0011 E-mail (New Zealand): nz_tech_support@dell.
Country (City) International Access Code Country Code City Code Department Name or Service Area, Website and E-Mail Address Area Codes, Local Numbers, and Toll-Free Numbers General Support 1-800-342-0671 Bolivia General Support toll-free: 800-10-0238 Brazil Website: www.dell.
www.dell.com | support.dell.com Country (City) International Access Code Country Code City Code Department Name or Service Area, Website and E-Mail Address China (Xiamen) Technical Support website: support.dell.com.cn Country Code: 86 Technical Support E-mail: cn_support@dell.com City Code: 592 Customer Care E-mail: customer_cn@dell.
Country (City) International Access Code Country Code City Code Department Name or Service Area, Website and E-Mail Address Area Codes, Local Numbers, and Toll-Free Numbers Czech Republic (Prague) Website: support.euro.dell.com International Access Code: 00 E-mail: czech_dell@dell.com Country Code: 420 Technical Support 22537 2727 Customer Care 22537 2707 Fax 22537 2714 Tech Fax 22537 2728 Switchboard 22537 2711 Denmark (Copenhagen) Website: support.euro.dell.
www.dell.com | support.dell.com Country (City) International Access Code Country Code City Code Department Name or Service Area, Website and E-Mail Address Area Codes, Local Numbers, and Toll-Free Numbers France (Paris) (Montpellier) Website: support.euro.dell.com International Access Code: 00 E-mail: support.euro.dell.
Country (City) International Access Code Country Code City Code Department Name or Service Area, Website and E-Mail Address Area Codes, Local Numbers, and Toll-Free Numbers Greece Website: support.euro.dell.com International Access Code: 00 E-mail: support.euro.dell.
www.dell.com | support.dell.com Country (City) International Access Code Country Code City Code Department Name or Service Area, Website and E-Mail Address Ireland (Cherrywood) Website: support.euro.dell.com International Access Code: 16 E-mail: dell_direct_support@dell.com Country Code: 353 Technical Support City Code: 1 U.K. Technical Support (dial within U.K. only) Home User Customer Care Small Business Customer Care U.K. Customer Care (dial within U.K.
Country (City) International Access Code Country Code City Code Department Name or Service Area, Website and E-Mail Address Japan (Kawasaki) Website: support.jp.dell.
www.dell.com | support.dell.com Country (City) International Access Code Country Code City Code Latin America Department Name or Service Area, Website and E-Mail Address Area Codes, Local Numbers, and Toll-Free Numbers Customer Technical Support (Austin, Texas, U.S.A.) 512 728-4093 Customer Service (Austin, Texas, U.S.A.) 512 728-3619 Fax (Technical Support and Customer Service) (Austin, Texas, U.S.A.) 512 728-3883 Sales (Austin, Texas, U.S.A.) 512 728-4397 SalesFax (Austin, Texas, U.S.A.
Country (City) International Access Code Country Code City Code Mexico Department Name or Service Area, Website and E-Mail Address Customer Technical Support 001-877-384-8979 or 001-877-269-3383 International Access Code: 00 Country Code: 52 Area Codes, Local Numbers, and Toll-Free Numbers 50-81-8800 Sales or 01-800-888-3355 Customer Service 001-877-384-8979 or 001-877-269-3383 50-81-8800 Main or 01-800-888-3355 General Support toll-free: 1-866-278-6822 Netherlands Antilles General Support 00
www.dell.com | support.dell.com Country (City) International Access Code Country Code City Code Department Name or Service Area, Website and E-Mail Address Norway (Lysaker) Website: support.euro.dell.com International Access Code: 00 E-mail: http://support.euro.dell.
Country (City) International Access Code Country Code City Code Department Name or Service Area, Website and E-Mail Address Area Codes, Local Numbers, and Toll-Free Numbers Singapore (Singapore) Website: support.ap.dell.
www.dell.com | support.dell.com Country (City) International Access Code Country Code City Code Department Name or Service Area, Website and E-Mail Address Area Codes, Local Numbers, and Toll-Free Numbers Spain (Madrid) Website: support.euro.dell.com International Access Code: 00 E-mail: support.euro.dell.
Country (City) International Access Code Country Code City Code Department Name or Service Area, Website and E-Mail Address Area Codes, Local Numbers, and Toll-Free Numbers Taiwan Website: support.ap.dell.com International Access Code: 002 E-mail: ap_support@dell.
www.dell.com | support.dell.com Country (City) International Access Code Country Code City Code Department Name or Service Area, Website and E-Mail Address Area Codes, Local Numbers, and Toll-Free Numbers U.K. (Bracknell) Website: support.euro.dell.com International Access Code: 00 Customer Care website: support.euro.dell.com/uk/en/ECare/Form/Home.asp Country Code: 44 City Code: 1344 Uruguay 138 E-mail: dell_direct_support@dell.
Country (City) International Access Code Country Code City Code Department Name or Service Area, Website and E-Mail Address Area Codes, Local Numbers, and Toll-Free Numbers U.S.A.
Appendix www.dell.com | support.dell.
Index A audio.
Index documentation End User License Agreement, 9 ergonomics, 9 Finding Information, 9 online, 10 Product Information Guide, 9 regulatory, 9 safety, 9 Setup Diagram, 9 warranty, 9 door front-panel, 62 hinge arms, 65 reattaching, 65 drivers about, 54 identifying, 54 drives front-panel inserts, 94 hard drive, 90 installing CD/DVD, 94, 101 installing floppy, 94, 98 installing hard drive, 92 problems, 34 RAID, 20 removing CD/DVD, 100 removing floppy, 97 removing hard drive, 91 second hard drive, 93 serial
K keyboard connector, 65 problems, 38 L labels Microsoft Windows, 10 Service Tag, 10, 62 lights back of computer, 49 CD/DVD drive activity, 61 diagnostic, 49, 63 floppy drive activity, 61 hard drive activity, 61 M memory 4-GB configurations, 73 DDR2 overview, 72 installation guidelines, 72 installing, 73 problems, 40 removing, 75 type supported, 72 messages error, 36 microphone connector, 64-65 Microsoft Windows label, 10 modem connector, 64 problems, 35 monitor blank, 46 clone mode, 20 connect DVI, 19-2
Index problems (continued) CD drive, 34 CD-RW drive, 35 computer crashes, 38-39 computer stops responding, 38-39 Dell Diagnostics, 52 diagnostic lights, 49 drives, 34 DVD drive, 34 e-mail, 35 error messages, 36 general, 38 hard drive, 35 IEEE 1394, 37 Internet, 35 keyboard, 38 memory, 40 modem, 35 monitor is blank, 46 monitor is hard to read, 47 mouse, 41 network, 42 power, 42 power light conditions, 42 printer, 43 program crashes, 39 program stops responding, 39 programs and Windows compatibility, 39
T V technical support policy, 119 VGA connector, 64 transferring information to a new computer, 28 video connector, 64 problems, 46 troubleshooting Dell Diagnostics, 52 diagnostic lights, 49 Hardware Troubleshooter, 58 Help and Support Center, 10 restore to previous operating state, 56 tips, 33 TV connect to computer, 19-20, 64 U USB booting to devices, 116 connectors, 62, 65 wizards Files and Settings Transfer Wizard, 28 Network Setup Wizard, 29 Program Compatibility Wizard, 39 voltage selection s
Index 146 Index