Look at the end of your box. See that little sticker with a serial number and a barcode? Peel it off and put it here for safe keeping. Or don’t. IMPORTANT DO NOT USE YOUR TRIPOD UNTIL YOU HAVE READ THESE INSTRUCTIONS. NO WARRANTY CLAIM WILL BE ENTERED INTO FOR THE MISUSE OR INCORRECT USE OF THESE PRODUCTS.
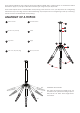
Punks tripods will either have twist leg locks with rubber bubble grips, or flip leg locks. To understand which instructions apply to your tripod, first check which type of leg lock your tripod has. Some Punks tripods have a detachable monopod leg, and some do not. If your tripod has an orange ring around the top of one leg, this is the detachable leg. If your tripod has no orange ring at the top of the leg, it does not have a detachable monopod leg.
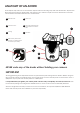
ANATOMY OF AN AIRHED Punks Tripods ship with one of two AirHeds. Tripods with twist lock legs ship with the AirHed Neo. Tripods with flip lock legs ship with the AirHed Mini. The easiest way to tell them apart is that the AirHed Neo has three control knobs. The AirHed Mini has two control knobs. 1 3 5 Release Plate Camera Screw Casing 2 4 6 Plate Lock Pan Knob (behind head) Not included on AirHed Mini. 2 Pan Base 7 Ball Control (AirHed Mini features a combined ball control and pan knob).
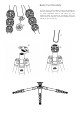
Basic Functionality b The Tri-Mount Plate comes with three hollow ends (a), for connecting your strap, carabiner, or other compatible devices. The central bolt can be removed and reversed, as it has both 1/4” and 3/8” threads (b). a d a c In the base of the centre column is a D-Ring (c), which is used to connect either your strap, for carrying, or the bag, for ballast, using the Toolz carabiner (d). We recommended storing your Toolz on the Tri-Mount plate when not in use.
Basic Functionality To remove the centre column, unscrew the D-Ring (a), and the collar (b). You can then pull out the column (c), and completely remove the collar (b). Your Tri-Mount Plate (d) should be unscrewed from the other end of the column, and then carefully screwed directly to the canopy (e).
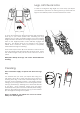
Legs, catches & locks In order to change the leg angle or to stow away your tripod you will need to pull down on the leg catch (a) maneuver the leg into the desired position and then release the catch. a To open and extend the tripod legs simply grip the friction locks (b) in your hand quarter turn, loosening the legs allowing you to select a desired height. Once the required height has been obtained, lock the legs in place by rotating back to the original position, which will fully engage the leg lock.
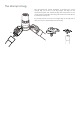
The Monopod Leg The monopod leg, where included, is denoted by a thin orange ring (a) on one of the leg hinges. This leg can be unscrewed. Screw the detached leg into the bottom of the centre column (after first removing the column from the tripod) to make the monopod. If your tripod does not have an orange ring on the leg then it does not have a detachable monopod leg.
Warranty Information Your 3LT product comes with a 5 Year Global Warranty. On the box you will find a sticker with a unique barcode and serial number. Use this serial number to register your products at www.3leggedthing. com/register. Details of your warranty can be found at www.3leggedthing.com If you have a question or suspect you have a fault, contact us first at www.3leggedthing.com/support.