
Specifications


56
3.2. You must now reboot the thin client to initialise the
installation procedure. The thin client will again boot over
the network, but will receive new parameters instructing it
to perform a hard disk installation.
3.3. The installer will check if you have free unpartitioned space
on the hard disk – if it finds free space, it will automatically
create a partition of 32 megabytes and install 2X
ThinClientOS. If you insert a USB key at this stage, the
option to create a USB key install is available.
3.4. If it does not find unpartitioned space, it will prompt you
whether you wish to:
3.4.1. Overwrite an existing partition – this option will
allow you to select an existing partition, which the
installer will use to install 2X ThinClientOS.
Important: All data on this partition will be erased.
3.4.2. Resize a partition – this option will cause the
installer to attempt to resize an existing partition by
reducing it by 32 MB, and then creating a new
partition for the 2X ThinClientOS.
3.4.3. Erase entire hard disk – this option will erase all
data on the hard disk and create a single partition
for 2X ThinClientOS.
3.4.4. Manually partition – this option will start a
partitioning program and allow you to re-partition
the hard disk. After the partitioning is complete, the
installer will allow you to select which partition to
install 2X ThinClientOS on.
3.5. The installer will now prompt you to install a boot loader
menu. This allows you to select, at boot-time, whether to
boot into 2X ThinClientOS or whether to boot into the
operating system which was originally installed.
3.6. The installer will now copy the 2X ThinClientOS image to
the hard disk. After it is finished, the machine must be
rebooted.
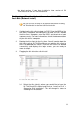
4. Configure the thin client to boot from the hard disk or USB disk
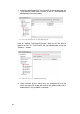
To cancel an installation select the thin client that is going to be
effected and click on “Install to Disk” > “Cancel Pending Disk
Installation”