
Specifications


142
b. using DNS
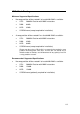
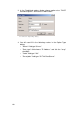
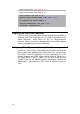
Screenshot 102: DNS configuration
1. If you are running the Microsoft Windows DNS server service,
go to Start > Administrative Tools > DNS. The DNS
configuration will start.
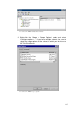
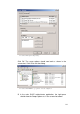
2. Go to the node Forward Lookup Zones and highlight your
domain (for example, internal.2x.com).
3. Right-click and select 'New Host (A) ...' to create a new ‘A’
record.
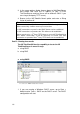
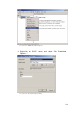
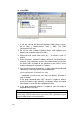
4. Enter 'thinserver', and the IP address of the 2X ThinClientServer
machine. Click 'Add Host' to enter the record. Note: Ensure that
the DNS suffix assigned to the machine by the DHCP server
matches the domain selected in ‘2’ above.
5. You can confirm that the previous 4 steps have been performed
correctly by executing, from a command prompt:
ping thinserver.internal.2x.com
…(replacing “internal.2x.com” with the domain selected in
step ‘2’ above).
If the ping command does NOT receive a response, please
review the above steps carefully and identify where you could
have made an error with the configuration steps.
6. If the ping command receives a response, you are ready to
proceed to the next step.
Firewall Issues:
Please note that for a DNS Server to resolve host and domain names
successfully, it will be necessary to ensure that TCP connections on port
53 to the DNS Server can be established.