2X ThinClientServer Version 6.
URL: www.2x.com E-mail: info@2x.com Copyright 2005-2009 2X Software ltd. 2X SOFTWARE Ltd. http://www.2x.com E-mail: info@2x.com Information in this document is subject to change without notice. Companies’ names and data used in examples herein are fictitious unless otherwise noted. No part of this document may be reproduced or transmitted in any form or by any means, electronic or mechanical, for any purpose, without the express written permission of 2X SOFTWARE Ltd.
Table of Contents Introduction to Server-based computing .................................................... 1 What is server-based computing? ............................................................... 1 The benefits of server-based computing ................................................. 1 What are thin clients? .................................................................................. 2 How does it work? ....................................................................................
(CD install) ................................................................................................ 52 Step 1: Downloading the thin client OS ................................................. 52 Step 2: Burning the ISO image to a CD-ROM ....................................... 52 Step 3: Configure the thin client to boot from CD-ROM ........................ 53 Step 4a: Installing 2X ThinClientOS on the hard disk............................ 53 Step 4b: Installing 2X ThinClientOS on a USB disk ......
Support...................................................................................................... 81 Licensing ................................................................................................... 81 Administrators ........................................................................................... 82 Backup Servers ......................................................................................... 83 System Backup ......................................................
Minimum Supported Specifications ..................................................... 133 Recommended Supported Specifications ........................................... 133 CD Booting .............................................................................................. 134 Minimum Supported Specifications ..................................................... 134 Recommended Supported Specifications ........................................... 134 HDD / Flash Booting...............................
Introduction to Server-based computing What is server-based computing? Server-based computing (SBC) is a technology whereby applications are deployed, managed, supported and executed on the server and not on the client. Instead only the screen information is transmitted between the server and client. This architecture solves the many fundamental problems that occur when executing the applications on the client itself.
5. Security – Server-based computing keeps all the data on the secure servers without it being 'spread out' onto the less secure client computers. Furthermore the server is in the server room, which is far more secure than on the user’s desk. 6. Less prone to viruses and security breaches – Servers are by definition better managed and because the server OS is more secure, it’s far more difficult for a computer to get infected by a virus. 7.
How does it work? Figure 1: Server-Based Computing The server-based computing technology revolves around 3 main components: 1. A multi-user operating system that allows multiple users to log on and work concurrently, using applications in separate, protected sessions on a single server. Examples of terminal servers are Microsoft Terminal Services 2000/2003, Citrix Metaframe and 2X TerminalServer for Linux. 2.
4 • Removes desktop software application upgrades • Removes desktop operating system upgrades • Removes viruses from the desktop • Reduces training costs • Reduces bandwidth costs • Reduces or eliminates the need for remote office servers • Reduces user downtime while waiting for help desk response • Reduces system downtime through better redundancy and disaster recovery capabilities • Applications available to all users anytime and anywhere • Quick expansion through ease of deployment
Introduction to 2X ThinClientServer What is 2X ThinClientServer? 2X ThinClientServer provides a complete solution for the central deployment, configuration and management of thin clients, and provides load balancing and redundancy of terminal servers. A small footprint Linux distribution is deployed to thin clients (all popular thin clients are supported) OR to normal PCs, allowing you to convert existing PCs to thin clients. Thin client settings (screen size, which terminal servers to log into, etc.
tool based on both users and clients. The administrator has the ability to do remote shadowing of the Thin Client as well as switching them on and off remotely. To help scale your centralized ThinClientServer deployment, a set of fully redundant ThinClientServers can be installed on the same network. These will be capable of distributing the load of both the ThinClientServer as well as the network bandwidth in your organisation.
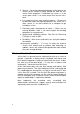
Figure 2: PXE booting 2. If you have selected PXE booting OR Etherboot, the thin client/computer will obtain the IP address of the TFTP server via DHCP broadcasts. (In most installations the TFTP server will be installed on the same server as 2X ThinClientServer). The thin client will then download the 2X ThinClientOS image from the TFTP server and proceed to boot up the thin client using that Operating System image. 3.
Figure 3: PXE booting 2. 2X ThinClientOS now prompts for the username and password. The username is passed to 2X ThinClientServer, which then looks for the user in the 2X ThinClientServer’s built-in database or Active Directory server. It finds the associated user profile and matches this user profile with connection settings for that user in the 2X ThinClientServer database. These connection settings are passed back to 2X ThinClientOS.
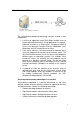
Figure 4: The complete thin-client boot and connection process 2X ThinClientServer components 2X ThinClientServer consists of a number of components: 1. The 2X ThinClientOS image – the actual Operating System that the thin client will boot. This image is either written to the hard disk or CD-ROM, and booted from there, or it is downloaded via TFTP and booted after download. 2. The 2X ThinClientServer program, which interacts with the actual thin client. 3.
6. A MySQL server – this is a light-weight SQL database server that stores all the connection settings for the users. 7. The PHP environment – PHP hypertext pre-processor is a widely-used general-purpose scripting language that is especially suited for web development. 2X ThinClientServer features Thin client vendor independent Use thin clients from different vendors, old/existing computers, or new low cost computers - and manage all these thin clients through one consistent and open interface.
How it works 2X ThinClientServer deploys a small footprint Linux-based OS to old PCs, new low cost PCs and to popular thin client devices (HP, Neoware, Wyse, Maxspeed and more). Thin clients always boot the latest version of the OS from the ThinClientServer. Hardware & connection settings (including resolution, logging and more) are retrieved from the server when the client logs on, making thin clients easy to manage.
Thin client computing: reduced administration and end user support Administrators can enjoy greatly reduced support and administration: Thin clients are far easier to manage since the thin client OS is deployed centrally and only includes a remote terminal client. Only the servers need to be managed, meaning that deploying patches, applications and virus updates is far easier. Enforcing desktop settings and backing up user files is easier too.
Installing 2X ThinClientServer on Windows System Requirements Before you install 2X ThinClientServer, please ensure that you meet all the following requirements • Windows 2000/2003/2008 server or Windows 2000/XP. • 256 MB of RAM or more • 800 MHz processor or higher • Approximately 128MB of free space for each 2X ThinClientOS you plan to upload. Step 1: Run set-up 1. Run set-up by double-clicking on the file 2XThinClientServersetup.exe.
2. After the welcome screen loads, click Next to start installation. Screenshot 2: License Agreement 3. In the License Agreement dialog box, review the License Agreement and click ‘I Agree’ to continue with the installation. Screenshot 3: Choosing the installation folder 4. 14 Choose the destination for 2X ThinClientServer and click ‘Next’.
MB of free hard disk space. Screenshot 4: Choosing the IP addresses for the service to listen on 5. If you have multiple network cards, or multiple IP addresses on one network card, setup will ask you for the IP address to which the 2X ThinClientServer must bind. Selecting Auto will let the system decide which is the default IP address to use by the ThinClientServer.
Screenshot 5: Setting the database credentials 6. Setup will ask you for the username and password that will be used to connect to the 2X ThinClientServer database and login to the Management Console. Click ‘Install’ to start the installation. 7. Setup will now copy all files and install the necessary services.
• 2X ThinClientServer Management Console (web-based) • 2X TFTP • 2X DHCP Helper • MySQL Windows XP Service Pack 2: Please note that Windows XP Service Pack 2 has the Windows Firewall enabled by default, and the first time a Web Server is installed (such as 2X ThinClientServer Management Console), will request the user to confirm whether to continue blocking “Apache HTTP Server”. It will be necessary to click the “Unblock” button on this dialog for the Management Console to function correctly.
IP address which will be used by your thin clients to boot against the 2X ThinClientServer. Firewall Issues: Please note that for a member server to join a farm successfully, it will be necessary to ensure that TCP connections on port 943 to the 2X ThinClientServer hosting the farm can be established. Screenshot 7: Initiating the replication process from the Master Server… This step is optional depending on if you chose to join an existing farm.
Screenshot 8: Waiting for the user to complete configuration … 9. You must now connect to the 2X ThinClientServer Management Console. Follow the steps shown during installatin to start configuring your Management Console. Please refer to Chapter 5 - Initial Configuration of 2X ThinClientServer for detailed initial configuration information.
Screenshot 9: Completing the 2X ThinClientServer Installation procedure.
Installing 2X ThinClientServer on Linux System requirements Before you install 2X ThinClientServer, please ensure that you meet all the following requirements • RPM-based or Debian-based Linux distribution • 256 MB of RAM or more • 800 MHz processor or higher • Approximately 128MB of free space for each 2X ThinClientOS you plan to upload. Step 1: Dependencies Distributions OpenSuSE 11.0 Dependency Packages compat-openssl097g compat-expat1 CentOS 5.2 compat-libstdc++ compat-libstdc6++-33.
dpkg -i thinclientserver-x-y.i386.deb Step 3: Configure server after installation It is required to configure the 2X ThinClientServer before the service is started up. Open a terminal as root (super user). Run the following command: 2Xthinclientserver_conf.sh Screenshot 10: Auto detection and licence review In the first part, the configuration script detects whether all necessary tools are present on the system. Then it backs the current configuration files for safe keeping.
Screenshot 11: Master or Slave Menu The setup then will then ask you to either configure this installation as a master server, i.e. to create a farm, or join this installation, as a slave, in a farm. Please choose accordingly. Screenshot 12: Master details If you are configuring a master server, you are prompted for a username and password to connect to the local MySQL database.
Screenshot 13: Slave details If, on the other hand, you are configuring a slave, prompted for the following information: 24 you are • Local MySQL database credentials. These, as in the master configuration, are using to connect to the local database. • Master server management console credentials. These credentials are used during the synchronization of the slave with the master server. • IP of master server. • The master console secure port. This, by default, is port 943.
Screenshot 14: Review information After entering all the information, you can review all details before porceeding with the configuration. If you are not satisfied, select No to go back and input the information again. Enter Yes if you agree. Screenshot 15: Services configuration and startup After you agree with all the settings, each individual service is configured. When this has finished, the Apache and MySQL services are started and the installation configured as either master or slave.
Distributions with SELinux If SELinux has been configured in enforcing mode, the script will test whether the 2X ThinClientServer services will start correctly. If not, the script will also suggest SELinux policy modifications. You need to accept these modifications before these are configured inside the policy. Distributions with AppArmor 2X ThinClientServer comes with a set of AppArmor profiles to add another security layer.
2X ThinClientServer Startup Configuration To complete installation of 2X ThinClientServer Ensure that JavaScript is enabled on the Web Browser you are using to access the Management Console. If JavaScript is not enabled, functionality of the Management Console will be severely impaired, and it will not be possible to complete the installation. To enable JavaScript in Internet Explorer, go to Tools -> Internet Options -> Security tab. Select the Local Intranet icon and click on the “Custom Level…” button.
A helpful Wizard is loaded when you open 2X ThinClientServer for the first time. This is there to configure the essential information needed for 2X ThinClientServer to start working. Screenshot 16: The Administrator login page for the Management Console. 1. Start by logging into the Management Console using the credentials set during the installation.
2. After login, the 2X ThinClientServer Wizard is started. Choose what type of database you will be using. You can choose to use a local MySQL server or an external MySQL or Microsoft SQL Server database. If you choose to use an external database you need to enter the following information 2.1. Database Name: Enter the name of the external database. 2.2. User Name: Enter the username used to log into the database. 2.3. Password: Enter the password used to log into the database. 2.4.
Screenshot 19: Select the user source for 2X ThinClientServer 4. If you will be using Active Directory to retrieve lists of users, groups, and organisational units, select “Active Directory”. If you will be using local users for the list of users to manage, select “Local Users”. Make sure that the Active Directory accounts are not expired as this might cause problems when the user tries to connect into his thin client.
4.2. Username: Enter a username residing within the selected domain which has read access to the directory. It is recommended to create a separate user for 2X ThinClientServer with a password that never expires. No data will be written to the Active Directory. The username should be in the format user@domain.com. 4.3. Password: Enter a password needed by the Active Directory to authenticate the user specified above. 4.4.
Click “Create User” to add the new user to the database and repeat the process until all the users you want are created. Please note that it is NOT possible to change the user list retrieval method after it has been selected. For a 2X ThinClientServer to retrieve Active Directory information successfully, it will be necessary to ensure that TCP connections on port 389 to the Active Directory Server can be established. Screenshot 22: Set Access Control 5.
Screenshot 23: Create a Default Desktop Component 6. Create a default desktop component for the users to access once they boot up 2X ThinClientOS. The desktop component will be shown on the 2X ThinClientOS desktop. Screenshot 24: Add a Remote Desktop 6.1. A Remote Desktop can be of type RDP, NX or Citrix ICA. These settings will connect the ThinClientOS directly to that address and provide a full (not published) desktop to the user.
Screenshot 25: Add a Published Application 6.2. A Published application can be of type RDP or Citrix ICA. These settings will publish all the applications / desktops on your desktop. 6.2.1. Select the protocol type from the drop down list: Windows (RDP) Citrix (ICA) 6.2.2. Select the “Connection Mode” to be used when connecting to your 2X ApplicationServer. Note that this option is not available if you are using a Citrix Server. 6.2.3.
7. 6.3.1. Enter the default homepage for the browser. 6.3.2. Select if you want to add Flash support and which version. Each plug-in will require more memory and local storage on the ThinClientOS. 6.3.3. Select if you want to add support for Java applets. 6.3.4. Select if the browser will be loaded in full screen or not. Once all the above settings are configured they will be added to the Default Profile and you can exit the wizard where 2X ThinClientServer will automatically be loaded.
Screenshot 28: Create the Default Profile for the Local Users already created 7.2. If you have chosen to use Local Users, the Default Profile will be used by the users you created in the Local Users page.
Configuring 2X ThinClientServer Log into 2X ThinClientServer Screenshot 29: The Administrator login page for the Management Console. 1. Type in the username and password for the administrator user who will have the rights to configure 2X ThinClientServer.
Screenshot 30: Management Console main information screen 2. After logging into the 2X ThinClientServer you will be presented with the Management Console main information screen. The warning icons in the centre of the page indicate the configuration procedures that must be performed prior to concluding the installation procedure.
1. Click on the “Directory” node under “User Profiles” from the sidebar. This will show existing Directories. If you would like to create a new Directory click on “New Directory”. Screenshot 31: Configuring the Directory Server. 1.1. Domain Name: Enter the domain name containing the users which will need to be assigned thin client logon rights. 1.2. Host: Enter the fully-qualified domain name (or alternatively the IP address) of an Active Directory server. 1.3.
1.7. Click “OK” when ready. Desktop Components 1. You can add a Remote Desktop. This desktop can be of type RDP, NX or Citrix ICA. These settings will connect the ThinClientOS directly to that address and provide a full (not published) desktop to the user. If more than one full desktop will be available to the user, such desktop will be accompanied by the 2X desktop with a desktop switcher and dedicated task bar.
1.1. Enter a name for the desktop. If more than one item is available to the user, the name will be used on the 2X desktop so that the user can identify which Terminal Server he/she will be connecting to. 1.2. Select the protocol type from the drop down list: Windows (RDP)* Linux (NX)** Citrix (ICA)*** Please note that for a Windows (RDP) Full Desktop Session to run successfully, it will be necessary to ensure that TCP connections on port 3389 to the Windows Terminal Server can be established.
Click on the “OK” button when ready. 1.6. Specify the “Display Settings” You may select the desired colour depth from the drop down list. You may select from a number of different resolutions from the drop down list You may select the desired window manager for the NX protocol type. Select Gnome or KDE. 1.7. If you use the NX protocol to connect to an NX server, you can use a custom DSA key to authenticate users connecting to the NX server.
2.1. Enter a name for the source of your published applications and/or desktops. This name will not be seen in the ThinClientOS. 2.2. Select the protocol type Windows (RDP)* Citrix (ICA)** * Please note that for a Windows (RDP) Published Applications Session to run successfully, it will be necessary to ensure that TCP connections on port 80 to the Windows Terminal Server can be established. Please note that 2X ApplicationServer MUST be installed on the network to enable 2X (RDP) Published Applications.
3. Next you can add the settings for a customized web browser on the ThinClientOS. This will be added to the desktop and such settings cannot be changed by the user. Make sure that the Thin Client has enough RAM to accommodate the multiple web pages that are displayed since more memory will be required and it depends on the web pages being rendered. Screenshot 34: Add the settings for a local web browser on the thin client.
3.1. Enter a name for the web browser. This name will be used on the 2X desktop. 3.2. Set the default homepage for the browser. 3.3. Select if you want to add Flash support and which version. Each plug-in will require more memory and local storage on the ThinClientOS. 3.4. Select if you want to add support for Java applets. 3.5. Select if you want to enable the Media Player inside the browser. 3.6. Select if the browser will be loaded in full screen or not. 3.7.
Screenshot 35: List of configured profiles. 1.2. A new form will load which contains the different sections needed for you to add a new profile Screenshot 36: Adding a new profile. 1.2.1. 46 Start by giving the user profile a unique name that can be used to quickly identify the different profiles in the list.
1.2.2. Select which users listed, from the Active Directory, will be included in the profile by selecting the user and checking their respective checkbox. 1.2.3. You can now select which remote desktops, published applications and local web browsers will be available to the users. 1.2.4. You can add applications such as Skype and a PDF Reader to be accessible by the users on the 2X ThinClientOS 1.2.5.
Screenshot 38: Adding a User Profile with local users. “Local Users” are stored in the central database of the ThinClientServer. They have got nothing to do with Windows/Linux local user accounts and credentials. 1.3. To add a new user simply inside the Directory in which the user will be added and click on ”New User”. Then enter the username, the full name and check the Profile box where you want the user to join.
Screenshot 39: Adding a new Local User 1.4. To add a user to a local profile go to User page from “User Profiles” > “Directory” > your directory and check the box where you want the user to join. Screenshot 40: Adding an existing user to a User Profile.
1. To add a new version of the 2X ThinClientOS click on “ThinClientOS” node under the “System” node from the sidebar. Click on “Upload ThinClientOS Image” to upload a new 2X ThinClientOS. After an image is uploaded you can use the “Set as Default” button to update the default settings for the OS. Thin clients using a specific OS and not the default settings will not be effected. Screenshot 41: 2X ThinClientOS 1.1. Click the “Browse…” button to locate and select the file downloaded.
Preparing the Thin Clients Introduction After you have installed the 2X ThinClientServer, you can proceed to install/configure a thin client or computer to boot 2X ThinClientOS. 2X ThinClientOS can be booted from a storage device (CD-ROM, hard disk, USB or flash disk) or it can boot over the network (PXE or Etherboot).
Thin Client System Requirements • Any thin client/computer with a Pentium processor or higher • 32 MB of RAM is needed for CD-ROM USB or hard disk • 64 MB of RAM is needed for PXE or Etherboot • 450 MHz processor or higher • If you want to boot via PXE, ensure that your thin client device supports PXE booting. Not all thin clients or computers can boot via PXE • If you want to boot via USB disk, ensure that your thin client device supports USB disk booting.
• • • • • Enable Buffer-Underrun Protection. Ensure that the downloaded ISO file is not in use (for example by anti-virus software). Set the burning speed to match the recommended speed specified by the CD-ROM media and gradually lower the speed if problems are encountered reading the CD-ROM. Ensure that the system has enough free resources to complete the burning process. If problems persist try to boot from the CD-ROM drive used to burn the ISO.
c) Erase entire hard disk – this option will erase all data on the hard disk and create a single partition for 2X ThinClientOS. d) Manually partition – this option will start a partitioning program and allow you to re-partition the hard disk. After the partitioning is complete, the installer will allow you to select which partition to install 2X ThinClientOS on. 5. The installer will now prompt you to install a boot loader menu.
the latest version, if you have installed a later version of 2X ThinClientOS on the 2X ThinClientServer. Configuring a thin client to boot from a hard disk, USB or flash disk (Network install) Be sure to make a backup of all important data before installing 2X ThinClientOS on both the USB and hard disk. 1. Configuring the thin client to boot via PXE: Enter the BIOS of the thin client / computer and configure it to boot via PXE.
To cancel an installation select the thin client that is going to be effected and click on “Install to Disk” > “Cancel Pending Disk Installation” 3.2. You must now reboot the thin client to initialise the installation procedure. The thin client will again boot over the network, but will receive new parameters instructing it to perform a hard disk installation. 3.3.
4.1. After you have installed 2X ThinClientOS, you must now ensure that the thin client / computer will boot from the appropriate boot device. Go into the computer’s BIOS and check that the boot sequence starts with the hard disk or USB depending on the target destination. Note that the 2X ThinClientOS will automatically update itself with the latest version if you have installed a later version of 2X ThinClientOS on the 2X ThinClientServer.
Configuring a thin client to boot via Etherboot using the 2X ThinClientOS LiveCD Step 1: Download the 2X ThinClientOS image Download the 2X ThinClientOS image as a ZIP file, called 2XThinClientOS_.zip from: http://www.2x.com/downloads Note: The Etherboot image is the same image used for PXE booting. Therefore if you have already downloaded the PXE image you can use that same image.
the downloaded .ISO file. • • • • • • • • If using Linux & K3B, simply go to Burn CD. Select the ISO image and click ”Start”. Use good quality CD-ROM (avoid CD-RW) media which is known to work with your CD-ROM drive. Burn the CD as a finalised single session using track-at-once (TAO). Enable Buffer-Underrun Protection. Ensure that the downloaded ISO file is not in use (for example by anti-virus software).
3. Install the downloaded 2X ThinClientOS version by going to the “ThinClientOS” node under “System” in the 2X ThinClientServer Management Console sidebar. Screenshot 44: Installing the latest 2X ThinClientOS Click on ”Upload ThinClientOS Image”. Now you will be able to browse for the 2X ThinClientOS file you downloaded using the “Browse…” button. Screenshot 45: Select new 2X ThinClientOS image 4.
Screenshot 46: Checking that thin clients use the latest 2X ThinClientOS 61
Managing Thin Clients & Sessions Introduction The 2X ThinClientServer Management Console allows you to manage thin clients and view past and active sessions. Managing the thin clients Some settings can only be managed on a ‘per-thin client’ basis. For example, you can specify a resolution for a particular lower end ThinClient. Screenshot 47: List of thin clients available for management To manage a thin client, click on the ”Managed” node under “Clients”.
You can use the search facility provided to filter by keywords those clients you would like view. Simply type some text in the search field and those thin clients that do not match the text entered will be filtered out of the list.
You can alter any of the settings. To save, click the “Save Settings” button. General settings Screenshot 49: Edit thin client general settings Name: Allows you to enter a recognizable name for the thin client. Hostname: Allows you to set the hostname the machine will respond to on the network. Printer: Allows you to enable or disable a printer. Timezone: Allows you to configure the thin client’s time zone. The actual time is sourced from the Thin Client machine’s BIOS.
Screenshot 50: List of Boot Options available for customization Version: Allows you to specify which version of the 2X ThinClientOS to use. Kernel: Allows you to specify which set of hardware support drivers the 2X ThinClientOS will use. Version 2.6 provides new and updated drivers for the latest hardware and has better support for USB attached devices. Version 2.4 is more suited for clients with older/slower hardware which have had limited success in booting with the newer kernel version.
Screenshot 51: List of Input Devices settings available for customization Mouse Model: Specify the mouse attached to the thin client. Keyboard model: Specify the keyboard attached to the thin client. Keyboard layout: Select the appropriate keyboard layout. Display Settings Screenshot 52: Display Settings customization options Use Default Settings: This will use the default settings that can be set for all the thin clients. By default this is enabled.
card. Refresh Rate (Hz): The frequency in Hertz by which the monitor will refresh every second. Please check the frequencies that the monitor supports. Video Card Driver: If the thin client has auto-detectable video hardware, the appropriate driver is displayed. If necessary, you may set the video driver manually for the thin client. Display Manager: The default setting for new thin clients is “Performance (Xorg)”.
Screenshot 53: Start the display test on the thin client Click on “Perform Test” to start the display test. You will be notified if the test was successful or not and the settings will be applied once the thin client is rebooted. Sound Settings Screenshot 54: Sound Settings Use Default Settings: This will use the default settings that can be set for all the thin clients. By default this is enabled.
Enable Sound: If enabled, this will allow the thin client to play sound. Sound Volume: This sets the sound volume for the thin client. Software Emulation: This should not be checked unless you hear any distortion during sound playback. If you do hear any distortion try using this option which introduces an intermediate sound engine that can help deliver a clear sound.
Login Banner Screenshot 56: Choose default banner Use default banner: Choose the banner that you want your thin clients to show during login.
Desktop Shadowing Screenshot 57: Setting shadowing parameters You can enable session shadowing for the thin client and specify the relevant password in this section. Click on the “Connect Now” button to start a shadowing session to this thin client. Groups A group can be created which defines a certain set of settings that affect all the thin clients which are members of the group. The settings are the same as those described in the previous sections but do not apply to a single thin client.
Screenshot 58: Adding a New Group Edit Group: Any group can be edited by selecting the group you want to edit and changing the settings from the frame that loads below.
Screenshot 59: Edit a group Delete Group: Any group can be deleted by clicking on “Delete Group”. Note that when a group is deleted the clients will adopt the standard default setting and they will NOT be deleted. Auto Assign Rules: Allows you to add the MAC and IP address of a client so that when it is booted for the first time the thin client is immediately added to the specified group.
those parameters that are individual thin-client related) can be applied as system-wide defaults in this section. To view the default settings click on “Default Settings”. When you are done editing the settings and would like to save click on “Save Settings” Power Options Screenshot 60: Power Options Switch on a Thin Client You can use this facility to switch on a thin client by sending a Wake-On-Lan signal to this thin client over the network.
Managing Printers Screenshot 61: A list of all the printers available 2X ThinClientServer supports printing to printers connected to a thin client. In order for this to work, an administrator must install the drivers for the printer connected to the thin client in the “System” > “Printer Management” node. To do this: Screenshot 62: Install Printer dialog 1.
2. Specify the name of the printer, the manufacturer, the model and the port to which it is connected. 3. If your printer is not listed: 1. Obtain your printer driver .INF file. 2. Return to the main Printer Management screen. 3. Click on “Upload Printer Driver” 4. Click on the “Browse” button and select the appropriate .INF file containing the setup information for your printer. The “Manufacturer” field and the “Model” field will now list the information contained in the .INF file selected.
8. At the next thin client log-on, the printer will appear under 'My Printers'. Managing Banners 2X ThinClientServer allows the system administrator to specify the default banner for all thin clients which have not been allocated a custom banner. Managing the 2X DHCP Helper 2X ThinClientServer allows the system administrator to specify which thin clients are allowed to connect using the configured connections, by applying selection rules that work by thin client MAC address.
administrators to decide if they will be approved or denied. Blocked: Will show those MAC addresses that are blocked. Any known MAC address can be blocked by clicking on the “Add MAC Address” button. To unblock a MAC address select the one(s) you would like to unblock and click “Unblock MAC Address” Approved: Will show those MAC addresses that are approved. MAC address can be added by clicking on the “Approve New MAC Address” button.
Screenshot 66: Views Setting default settings for all thin clients You can use this facility to provide system-wide defaults for all thin clients connected to this 2X ThinClientServer. All you need to do is click on the “Clients” node and then click on the “Default Settings” button. All parameters described in “Editing thin client settings” (except for those parameters that are individual thin-client related) can be applied as system-wide defaults in this section.
Reporting You can use this facility to view graphical usage reports by username or by thin client specifying the time ranges you would like to examine. Screenshot 67: User Reports Sessions The ‘Sessions’ node shows you the users that are or have connected to a terminal server. There are 3 sub-nodes for currently active sessions, past sessions and erroneous sessions.
Support The highest node which is the “ThinClientServer” node shows a link to documentation and support relative to the day-to-day usage of 2X ThinClientServer. Screenshot 69: Support Link Download Server Debug: This button will allow the user to manipulate options for debugging and logging of session events for 2X ThinClientServer and 2X ThinClientOS for subsequent submission to the 2X Support Centre for effective resolution of support issues.
Screenshot 70: Licensing Administrators This node will allow the user to manage credentials for access to the Management Console and the parameters assigned to each administrator.
New Administrator: Click the ‘New Administrator’ button to add an Administrator to the list, specifying the username, password and session timeout duration. Click ‘OK’ to save the new administrator. Screenshot 72: New Administrator Form Delete Administrators: Click the ‘Delete Administrator’ button to delete the selected administrators. Edit Administrators: Click an administrator’s username to display the “Edit Administrator” form to adjust the parameters assigned to the selected administrator.
Screenshot 73: Backup Servers “Remove Slave” will remove the selected backup server from the farm. The DHCP Helper on the backup server will also be disabled. To reconnect the backup server to the farm, you need to reinstall 2X ThinClientServer on the backup server. System Backup This node will allow the user to create backup files for disaster recovery purposes. Screenshot 74: System Backup dialog Create Backup: Click this icon to start the backup procedure.
Screenshot 75: Backup Progress show in the bottom right hand corner Screenshot 76: List of stored backups Restore Backup: Select the backup set for restore and click the “Restore Backup” button. Upon the completion, the Management Console will resume from the login screen. Download Backup: Select the backup set for download and click the Download icon. The Management Console will now prompt for a location to save the file. This feature allows the creation of off-site backups.
Thin client user manual Introduction Connecting and working on a terminal server is transparent compared to working on a normal PC. However there a few small differences, which are detailed in this chapter. It makes sense to copy and paste this chapter into an email and send to users who have been switched to thin client desktops. Logging on to your desktop Screenshot 77: 2X ThinClientOS booting up When you switch on your thin client/computer, 2X ThinClientOS will present you a logon screen.
Screenshot 78: Logging in Logging off the Terminal Server If you want to shut down your session with the terminal server, simply log off. You will be returned to the 2X ThinClientOS screen. To power off the thin client/computer, select “Shut down”.
Accessing local shares & storage devices Screenshot 79: Accessing media on the thin client Screenshot 80: Accessing media on the thin client in a Citrix environment If the thin client on which a user is working has local storage – for example a hard disk, CD-ROM drive or even a USB stick, then the user can access this media via a link ”Media on thin client” 88
(provided the administrator has granted access). In Windows, this appears as an icon with hard disk and a network connection. The screenshot shows how the local storage will appear. Users can use this storage as they would normally do on their computers.
Upgrading or Repairing a 2X ThinClientServer Installation Upgrading 2X ThinClientServer 1. Run setup by double-clicking on the file 2XThinClient-6_xsetup.exe. Screenshot 82: Upgrading 2X ThinClientServer 2. You will be informed with a window that the upgrade will require a new licence key. If you want to proceed click “Yes” Screenshot 83: Upgrade prompt 3. 90 Click “Next” to proceed with the upgrade.
Screenshot 84: Uninstall Screenshot 85: Installing the new version of 2X ThinClientServer 4. Click “Next” to proceed to the License agreement page. 5. Click “I Agree” to accept the License Agreement. You must accept the agreement to install 2X ThinClientServer.
Screenshot 86: The 2X ThinClientServer License Agreement 6. The next dialog will show you the destination folder where the upgraded files will be installed. Click “Next”.
7. If you have multiple network cards, or multiple IP addresses on one network card, setup will ask you for the IP address to which the 2X ThinClientServer must bind. Select Auto unless you want to exclude a particular network card.
8. Setup will ask you for a username and password for the settings to connect to the 2X ThinClientServer database. Note that the credentials for the Management Console will not change. Screenshot 89: Insert Database Credentials 9. 94 After all the files are copied setup will ask you whether you want to create a 2X ThinClientServer farm or join an existing farm. If this is the first time you are installing 2X ThinClientServer, choose “Create Farm”.
Screenshot 90: Creating or Joining a 2X ThinClientServer Farm 10. Setup will ask you to configure 2X ThinClientServer but unless there are any changes you can just click “Confirm”. Screenshot 91: Configure your 2X ThinClientServer 11. Once you click Confirm setup will be complete. Click “Finish” to end the setup process.
Uninstalling 2X ThinClientServer Uninstalling 2X ThinClientServer 1. Locate the “2X ThinClientServer 6.0” caption listed in the “Add/Remove Programs” application inside the Control Panel. 2. Click on the button “Change/Remove” to start the installation process. Screenshot 92: Choose “Uninstall” 3. Choose the “Uninstall” option as shown above. 4. Click on “Next” to proceed with the un-installation. 5. Click on “Finish” when done.
Firewall Settings From: To: Port: Description Thin Client 2X TerminalServer TCP 22 Remote Session Thin Client Citrix Server TCP 1494 Remote Session Thin Client Citrix Server TCP 443 Remote Session HTTPS Thin Client MS Terminal Server TCP 3389 Remote Session Thin Client 2X Application Server TCP 3389 Remote Session Thin Client 2X Application Server TCP 80 Remote Session Thin Client DNS Server UDP 53 Name Resolution Thin Client DHCP Server UDP 67 TCP/IP Settings Retrieval Th
Troubleshooting When troubleshooting an error lookup the matching code from this section. If you require further information on what is happening on the thin client follow the instructions on how to contact support in Chapter 8 under the section “Support”. 2X ThinClientServer External Database 2X ThinClientServer provides a small utility to change the IP address of the external database, should you need to change the IP address of the external database server.
Corrupt installation detected. Please contact 2X Technical Support. TCMR002 Installer package not available. Corrupt installation detected. Please refer to Chapter 6 and review the methodologies for creating a bootable CD from an ISO file. For further assistance please contact 2X Technical Support. TCMR003 Distribution not found. Corrupt installation detected. Please refer to Chapter 6 and review the methodologies for creating a bootable CD from an ISO file.
TCMR015 Unable to mount installer image. Corrupt installation detected. Please refer to Chapter 6 and review the methodologies for creating a bootable CD from an ISO file. For further assistance please contact 2X Technical Support. TCMR016 Unable to pivot to new root. Corrupt installation detected. Please contact 2X Technical Support. TCMR018 Unable to update rootdisk image. Hard Disk error detected. Please re-install 2X ThinClientOS to attempt to resolve this issue.
• A record to a DNS server • A DNS suffix Should you be doing a PXE install you may optionally need: • An entry for thinsrv pointing to your 2X ThinClientServer • An entry to the IP address of the TFTP server providing the boot image and settings. If you are using the TFTP server bundled with 2X ThinClientServer then the IP address is the same as that of 2X ThinClientServer • An entry for the path of the PXE loader called pxelinux.0 TCAC003 Unable to mount root file system read-only.
TCUP002 Unable to download X11R6 package. There seems to be an error while downloading the Video package for 2X ThinClientOS. In the case of PXE booting this may be due to insufficient memory on the thin client. If you have performed a Hard Disk installation, this may be due to insufficient space. TCUP004 Unable to download rootdisk package. There seems to be an error while downloading the 2X ThinClientOS package. In the case of PXE booting this may be due to insufficient memory on the thin client.
ThinClientServer. This may be due to an error in the file hosted on the 2X ThinClientServer, a network transmission error, or lack of space on the 2X ThinClientOS. TCUP017 Unable to mount services package. A corruption has occurred in the package downloaded from 2X ThinClientServer. This may be due to an error in the file hosted on the 2X ThinClientServer, a network transmission error, or lack of space on the 2X ThinClientOS. TCUP018 Failed to overlay services package.
TCUP030 Unable to overwrite minird with update. An error has occurred while replacing a package with a newer version. This may be due to lack of space on the 2X ThinClientOS or a corruption on the hard disk. TCUP031 Unable to copy rootdisk update. An error has occurred while copying new package version to disk. This may be due to lack of space on the 2X ThinClientOS or a corruption on the hard disk. TCUP034 Unable to remount media as read/write.
TCUP040 Minird package doesn't match checksum. A corruption has occurred in the minird package. This may be due to an error in the file hosted on the 2X ThinClientServer, a network transmission error, or lack of space on the 2X ThinClientOS. TCUP041 Kernel package doesn't match checksum. A corruption has occurred in the kernel package. This may be due to an error in the file hosted on the 2X ThinClientServer, a network transmission error, or lack of space on the 2X ThinClientOS.
compatible video card is required to start in graphical mode. Please contact 2X Technical Support with the exact details of the Manufacturer and Model of the video card used as well as that of the monitor. TCSX001 No configuration ThinClientServer. was returned by 2X 2X ThinClientOS failed to receive the required configuration file from the 2X ThinClientServer. This could be possible to a misconfigured server or a server mismatch.
TCSX008 Unable to download video card driver. There seems to be an error while downloading the video card driver for the 2X ThinClientOS. In the case of PXE booting this may be due to insufficient memory on the thin client. If you have performed a Hard Disk installation, this may be due to insufficient space TCSX009 No banner was received from 2X ThinClientServer. There seems to be an error while downloading the logon banner for 2X ThinClientOS.
on the hard disk. TCSP009 Unable to mount package. An error has occurred while loading the package into the system. This may be caused by a network transmission error or hardware failure. TCSP010 Failed to overlay package. An error has occurred while configuring the system with the new package. This may be caused by a system corruption or hardware failure. TCSP011 Unable to copy download package from temporary location. There seems to be an error while copying a package inside the 2X ThinClientOS.
TCSS004 Your connection requires an ICA session however the client is not available. The 2X ThinClientOS you are using is designed for a different Terminal Server. Please contact your administrator to obtain a version of 2X ThinClientOS targeted for an ICA session. TCSS005 Your RDP session terminated abnormally. A network error has occurred while connected to your Remote Session. This can be due to incorrect settings or else due to the session being interrupted from the Terminal Server.
TCSS011 Your connection requires RDP published applications however the client is not available. A required component to access RDP publish applications is missing. This could be caused by a corrupted package. TCSS012 Your desktop session terminated abnormally. An error has occurred during the desktop session. This could be caused by a corrupted system or faulty hardware. TCSS013 Your connection requires ICA published applications however the client is not available.
TCSS021 Unable to populate protocol sessions. An error has occurred when transferring the list of session settings for the user from the ThinClientServer. This could be due to a network error or due to a missing setting which is still registered to that user. TCSS022 Unable to retrieve session settings from 2X ThinClientServer. An error has occurred when transferring the list of session settings for the user from the cached store.
TCSS029 Invalid credentials when connecting to . The credentials supplied to the 2X desktop are not valid for this host. Make sure that the username, password as well as the domain are correct. 2X ThinClientServer (Windows) Slave Redundancy Error Messages TCSRD001 This is not the master server. The IP/hostname of the server you provided is not a 2X ThinClientServer in master mode. TCSRD002 The master cannot reach the slave server.
TCSRD007 Cannot get mysqldump. A critical error has occurred when replicating the database contents. Follow the instructions to generate a debug log and send it to the 2X Support Centre. TCSRD008 Invalid or expired licence key. Contact your 2X ThinClientServer sales representative for an Enterprise Edition licence key. TCSRD051 Cannot open session lock file. An error has occurred when attempting to read the session lock file. Make sure that you have the sufficient credentials to perform these operations.
Ensure that you have enough permissions to complete the replication process and that there is enough disk space to replicate the master server. If the problem persists, follow the instructions to generate a debug log and send it to the 2X Support Centre. TCSRD058 Cannot register the slave server. An error has occurred when registering the slave in the database. Follow the instructions to generate a debug log and send them to the 2X Support Centre. TCSRD059 Post update schema mismatch.
TCSRD073 License file transfer error. An error has occurred when transferring the licence to the slave server. TCSRD099 An error has occured in the replication process. The installation could not be completed successfully due to an error that occurred during part of the installation. 2X ThinClientServer (Linux) Install Error Messages TSIN001 A critical internal error occurred while executing the installation scripts.
TSIN006 The previous installation might be corrupt. Please remove it completely and re-install your latest version. An error has occurred during the update which does not allow you to use your previous version of 2X ThinClientServer. Uninstall your current versions and install your latest version. TSIN007 The FQDN and the local hostnames resolve to different IPs. The IP addresses resolved by the Fully Qualified Domain Name (FQDN) and the local hostname do not match.
TSIN014 Cannot create or modify the services' users or group . Each service has its own set of credentials that are created or modified during installation. This error message will be displayed if this process fails. TSIN015 Could not install/configure the services' wrapper scripts. Each service is managed by a wrapper script that sets the required paths and libraries. This error occurs if these scripts cannot be configured during installation.
necessary to store configuration information. 2X ThinClientServer installation cannot proceed. The log file indicated will provide further details to identify the issues affecting your server relevant to this error to assist in resolving the issue. TSIN023 Could not start/stop the MySQL server. Please check both the MySQL error log file under /var/opt/2X/thinclientserver/mysql/data/2XTCSmysql.e rr and the 2Xlogreport.txt file.
completed. TSIN029 Could not load the run level paths from detection file. Will try to detect path using the find command. When uninstalling the product the installer fetches the run level directory paths from the XML file generated during installation. If the XML file is not found, the installation will try to find the path using the Find utility. TSIN030 Could not un-install the 2X thinclientserver service and associated links.
link. If this link is not found the installation process will try to create it. This error is displayed if this link could not be created. TSIN036 Errors were encountered when un-installing the 2X ThinClientServer AppArmor profiles. This error only applies if AppArmor is running. During the uninstallation process the AppArmor profiles are removed from the /etc/apparmor.d directory. This error occurs when this process could not be completed.
TSCS006 The appropriate EULA file for your language setting is missing. The EULA file for your current language is missing. TSCS007 A suitable pager, to display the EULA file, was not detected. Please check that you have the less, more, or cat utilities installed. To display the EULA file on screen one of the following pagers must be installed on the system: less, more or cat. Please install either one of them and restart the configuration. TSCS008 Could not display the EULA file.
TSCS014 Could not remove the MySQL database. The MySQL database in the /var/opt/2X/thinclientserver/mysql/data/ could not be deleted during installation. TSCS015 Could not install the MySQL database. The configuration script was unable to create the necessary MySQL databases. The 2X ThinClientServer configuration cannot proceed. The log file (/var/opt/2X/thinclientserver/mysql/data/2XTCSmysql.err and the 2Xlogreport.txt) will provide further details relevant to this error to assist in resolving the issue.
TSCS021 Could not configure the TFTP service. The TFTP service used to serve the kernel and root disk images during PXE booting of thin clients could not be configured. TSCS022 Could not backup the XML report and log files. When the configuration finishes, the XML report and log files are backed up for safe keeping. This error is displayed if the backing up process fails. TSCS023 The appropriate SELinux file for your language setting is missing.
TSCS029 Unable to install the necessary packages. The configuration script could not install the necessary SELinux packages to be able to configure the SELinux policy. TSCS030 Could not backup the current policy directory. Before attempting any SELinux policy configuration changes, the old policy directory is backed up. If the backup process fails, this error will be displayed. TSCS031 Failed to append the custom rules to the policy’s local.te file.
permissive mode before trying to determine the SElinux rules. TSCS038 Could not switch SELinux to enforcing mode. The configuration script failed to set the SELinux state to enforcing mode before trying to test whether the 2X ThinClientServer services started correctly. TSCS039 Could not populate the list of AppArmor profiles to install. If AppArmor is enabled a set of profiles is installed into the /etc/apparmor.d directory.
TSCS046 Cannot reload installed policy. After the necessary changes, the SELinux policy must be reloaded for the changes to take effect. TSCS047 Unable to clear shared memory. Please clear it manually by using the ipcrm and ipcs tools. At the start of the configuration process, the shared memory is cleared to minimise the chances of errors during configuration. If this fails, use the ipcrm and ipcs tools to find and clear the shared memory segment allocated to the 2X ThinClientServer.
match the credentials used in the Management Console. Verify that the credentials are correct in the Management Console and try again. TSRD006 Administrator does not have the rights to install new slaves in this farm. You do not have enough rights to install a slave server. Contact your administrator. TSRD007 Cannot get mysqldump. A critical error has occurred when replicating the database contents. Follow the instructions to generate a debug log and send it to the 2X Support Centre.
TSRD056 File open error. A required file in the replication process is missing. Ensure that all ThinClientOS images on the master server are installed correctly. If the problem persists, follow the instructions to generate a debug log and send it to the 2X Support Centre. TSRD057 File write error. A required file in the replication process could not be written. Ensure that you have enough permissions to complete the replication process and that there is enough disk space to replicate the master server.
TSRD071 Cannot create licence file. An error has occurred when attempting to write the session lock file. Make sure that you have the sufficient credentials to perform these operations. TSRD072 Cannot write licence file. An error has occurred when attempting to write the session lock file. Make sure that you have enough disk space. TSRD073 License file transfer error. An error has occurred when transferring the licence to the slave server. TSRD099 An error has occurred in the replication process.
Advanced Configuration 2X ThinClientServer Configuration Options When diagnosing issues with 2X ThinClientServer, 2X ThinClientOS, or actual Thin Clients, it is possible to set configuration options to override certain behaviour, allowing the Administrator to circumvent potential pitfalls. These options are activated or deactivated by adding lines in the text file (creating it if necessary): …/conf/options.conf …located under the “htdocs” folder containing the Management Console installation.
RDP_VERSION=4 The default value for RDP connections is version 5.x. Version 4 is used on legacy Windows NT Terminal Servers. NUMLOCK=ON The default behaviour is to leave the NUMLOCK to be set by the BIOS of the PC. You can specify the state of the NUMLOCK for all your ThinClientOS installation by setting it to OFF or ON depending on your requirements. DESKLOCK=1 When this option is set, it is possible to use the NUMLOCK as a toggle when switching between multiple “Full Screen” connections.
MASTER_VOLUME=99 The default volume of the ThinClientOS volume mixer is set to maximum due to the low output of some sound cards. This can be set to a lower value depending on the requirements of the administrator. The values accepted range from 0-99. BLANK_TIME=5 This setting affects the amount of time the ThinClientOS will wait to blank the screen as an effort to reduce screen burn (screen saver). The amount quoted is in minutes.
Specifications for 2X ThinClientOS The specifications of your Thin Client depend on two factors: Boot Method and amount of items being published to the desktop. The following guidelines are given to grasp a better idea of the capabilities you will be capable of using depending on your available specifications. A PXE boot method affects the amount of RAM required by the 2X ThinClientOS since this is used to store the program files. It will also affect startup time depending on the congestion of the network.
CD Booting Minimum Supported Specifications • CPU: 200MHz Pentium with MMX Instructions • RAM: 32Mb • HDD: none • CDROM: CD Reader Recommended Supported Specifications • CPU: 200MHz Pentium with MMX Instructions • RAM: 128Mb • HDD: none • CDROM: CD Reader 134
HDD / Flash Booting Minimum Supported Specifications • • No swap partition will be created if at least 64Mb RAM is available: • CPU: 200MHz Pentium with MMX Instructions • RAM: 64Mb • HDD: 32Mb • CDROM: none (except required for installation) A swap partition will be created if less that 64Mb RAM is available: • CPU: 200MHz Pentium with MMX Instructions • RAM: 32Mb • HDD: 64Mb • CDROM: none (except required for installation) Please note that using a Flash disk in a scenario that requi
Legacy DHCP configuration Preparing the DHCP server (Windows) The 2X ThinClientServer is shipped with DHCP Helper application as standard. This is included in both the Standard and Enterprise editions. It is encouraged to use the bundled DHCP Helper.
Screenshot 94: DHCP administration utility 2. Right-click the ‘Scope > Scope Options’ node and select “Configure options…”. If you have multiple subnets, be sure to select the scope options of the subnet in which you wish to use 2X ThinClientServer.
3. In the scope options dialog, browse down to '066 Boot Server Host Name' and enter the IP address of your TFTP/2X ThinClientServer machine (these will be different ONLY if you are using a third-party TFTP server). 4. Browse to the '067 Bootfile Name' option and enter a String Value of 'pxelinux.0'. Firewall Issues: Please note that for a DHCP Server to provide TCP/IP settings to the Thin Client successfully, it will be necessary to ensure that: 1.
Screenshot 97: DHCP Predefined Options 2. Right-click on DHCP server and select "Set Predefined Options...
3. In the Predefined options dialog, choose option class "DHCP Standard Options" and click the "Add" button. Screenshot 99: Option Type dialog 4. You will need fill in the followings values in the Option Type dialog: 140 • "Name:" field type "thinsrv" • "Data type" field choose "IP Address" and tick the "array" checkbox • "Code" field type "193" • "Description" field type "2X ThinClientServer".
Screenshot 100: Option Type dialog Click OK. The server options should now look as shown in the screenshot. Click OK to exit the dialog. Screenshot 101: DHCP scope options correctly configured 5. In the main DHCP administrator application, the right pane should show the Scope Options as in the screenshot above.
b. using DNS Screenshot 102: DNS configuration 1. If you are running the Microsoft Windows DNS server service, go to Start > Administrative Tools > DNS. The DNS configuration will start. 2. Go to the node Forward Lookup Zones and highlight your domain (for example, internal.2x.com). 3. Right-click and select 'New Host (A) ...' to create a new ‘A’ record. 4. Enter 'thinserver', and the IP address of the 2X ThinClientServer machine. Click 'Add Host' to enter the record.
Preparing the DHCP server (Linux) The 2X ThinClientServer is shipped with DHCP Helper application as standard. This is included in both the Standard and Enterprise editions.
option thinsrv 192.168.0.10; option routers 192.168.0.1; next-server 192.168.0.10; option tftp-server-name "192.168.0.10"; # required by Intel PXE-2.1 server-identifier 192.168.0.10; filename "/pxelinux.0"; } Preparing the DNS server (optional) If one or more of your thin clients will be booting from CD-ROM or hard disk, you have to configure an ‘A’ record in your DNS server called ‘thinserver’, which points to the 2X ThinClientServer machine.